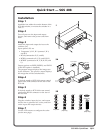
Quick Start — SGS 408, cont’d
SGS 408 • Quick StartQS-2
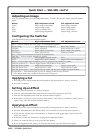
Adjusting an Image
From the default screen, press the indicated button. To adjust the preview image, press the button
again.
Button Right adjustment knob Left adjustment knob
Center Move image horizontally Move image vertically
Size Adjust image width Adjust image height
Filter Select horizontal filter Select vertical filter
Level Adjust image brightness Adjust image contrast
Configuring the Switcher
From the default screen, press the Menu button.
Button Right adjustment knob Left adjustment knob
Next — Press to display the next “page “ of configuration options.
Input Config Select input to be configured. Select video format.
Out Rate Select resolution. Select refresh rate or lock*.
Out Sync Select output sync format. Select output sync polarity.
Test Pattern Select output device. Select test pattern.
Exit — Press to exit the menu and return to default screen.
Edit Title — Press to display the title box options.
Prog Lock Turn program keylock on/off. N/A
LCD Adjust LCD screen contrast. Adjust LCD screen brightness.
Reset — Press to select reset of program, preview, program and preview, or system.
Edit Title (press ECP) — Press to toggle between title window or key effect.
Edit Title (press Center) Adjust horizontal shift. Adjust vertical shift.
Edit Title (press Size) Adjust title box width. Adjust title box height.
Edit Title (press reset) — Press Reset button to return title box to its original size and location.
System Reset — Press button again to reset all settings to their factory defaults.
* The output frame rate is locked to the frame rate of input #1.
Applying a Cut
1. Press the preview input button that corresponds to the input that you want to switch to.
2. Press the Cut button.
Setting Up an Effect
1. Press the Effect button that you want to program.
2. Turn the right adjustment knob until the name of the effect appears on the LCD.
3. Turn the left adjustment knob until the desired duration appears.
4. If the effect is a dissolve or title, press the Take button. If the effect is a standard, curtain, plus, or
square wipe, press the desired transition button.
Applying an Effect
1. Press the preview input button that corresponds to the input that you want to switch to.
2. Press the Effect button for the desired effect. (If it is already lit, you do not need to press it.)
3. Verify that the selected effect and transition, as displayed in the upper right corner of the LCD
screen, are correct.
4. If desired, override the duration by turning the left adjustment knob.
5. When you want the effect to occur, press the Take button.
6. If you are applying a title, when you want the title to end, press the Take button again.