54
55
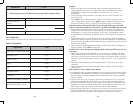
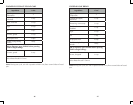
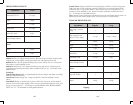
Ingredients 1.5 lb.
Tapioca our ½ cup
Cocoa powder 1 tbsp.
Xanthan gum 1 tbsp.
Caraway seeds 1 tbsp.
Red Star Quick Rise™
Yeast
4½ tsp.
Select Gluten Free Course
BREAD / PIZZA / PASTA DOUGH COURSES
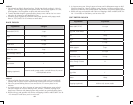
Dough Courses Method:
1. Add ingredients to bread pan in order listed. Refer to MEASURING YOUR
INGREDIENTS. Place bread pan into breadmaker. Push down on rim until it ts
rmly into place. Close lid.
2. Press MENU button; choose Bread Dough or Pizza Dough Course. Press LOAF
to choose loaf size and then CRUST to choose crust color. If delay bake is
desired, press ▲/▼ buttons to set delay bake timer, and then press START for
delay; or, simply press START to begin immediately.
Important: Don’t use delay bake timer if your recipe includes eggs, fresh milk,
yogurt or other dairy products, meats, sh or any other ingredients that may spoil.
3. When your dough is nished, breadmaker will beep and “0:00” will appear
in display window. Press STOP and open lid. Remove dough from bread pan.
Follow recipe shaping and baking instructions.
Dough Course Hints for Best Results
• If using delay bake timer, make sure yeast is on top of our, away from liquids.
Important: Never allow dough to remain in breadmaker after Course is complete;
it may over rise and damage machine.
• Rising times for dough after it is shaped and placed in baking pan will vary due
to recipe, temperature and humidity level of your kitchen. Optimum temperature
of room for rising is 80°– 85°F/27°– 29°C. Rising is most essential feature in
bread making.
• Breadmaker allows dough to have rst rise or fermentation before dough is
removed. Fermentation conditions gluten, (becoming pliable and elastic with a
soft, smooth quality) develops avor and leavens product.
• Sometimes a double rising is benecial especially for whole grain or 100% whole
wheat bread. Let dough rise once in breadmaker. Remove from breadmaker,
punch down, let rise again, punch down and let rest 10 minutes. Resting allows
gluten to relax and makes handling easier. Shape as desired and allow to rise
until doubled in volume. If only 1 rise is desired, remove from breadmaker, let
rest, shape and rise as above.
12. Place bread pan into breadmaker. Push down on rim until it ts rmly into
place. Close lid.
13. Press MENU and choose Gluten Free Course. Press START to start course
cycles immediately.
Important: Don’t use delay bake timer if your recipe includes eggs, fresh milk,
yogurt or other dairy products, meats, sh or any other ingredients that may spoil.
14. About 5 – 10 minutes in Kneading cycle, check mixture. It should swirl
about the bread pan with a denite raised pattern on top. At this time, use a
rubber spatula to push any our or dough from the sides of the pan down into
the mixture.
15. At end of baking cycle, a beep will sound. Press STOP and use oven mitts to
carefully remove bread pan. The indicator light will go out when the STOP
button is pressed.
Caution: Bread pan, kneading paddle and bread will be extremely hot. Use oven
mitts.
16. Turn bread pan upside-down and shake several times to release bread. Do
not use metal utensils inside bread pan or breadmaker. Remove kneading
paddle and allow loaf to cool standing upright on wire rack approximately
15 – 30 minutes prior to slicing.
17. Cut loaf in half, top to bottom, then cut each half into ½-inch slices.
18. When bread has cooled completely (approximately 1 hour), store in an
airtight container.
Unplug unit and allow to cool completely before cleaning. Clean bread pan after
each use.
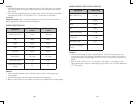
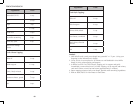
GLUTEN FREE PUMPERNICKEL BREAD
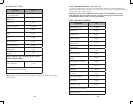
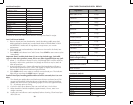
Ingredients 1.5 lb.
Water (110 – 11 5 °F / 43
– 46 °C)
1 cup
Extra large eggs 3
Oil 3 tbsp.
Cider vinegar 1 tsp.
Molasses 3 tbsp.
Salt 1½ tsp.
Dry milk ½ cup
Brown rice our 2 cups
Potato starch our ½ cup


