


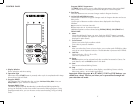
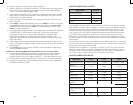

10
11
73. Low Carb
74. Gluten Free
75. Batter Breads™ / Cake Light
76. Batter Breads™ / Cake Medium
77. Batter Breads™ / Cake Dark
78. Jam
79. Dough (1 lb)
80. Dough (1.5 lb)
81. Dough (2 lb)
82. Pizza dough
83. Bake Only
84. – 88. Personal Recipes
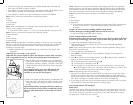
How to Use
This product is for household use only.
Important: Your breadmaker has an intelligent fuse system designed to protect
the motor from overheating. It will automatically shut off the motor if there is
an overheat risk. If this occurs, unplug the appliance, wait a few seconds for it to
cool down, and plug in again following the instructions.
GETTING STARTED
• Remove packing materials and any stickers.
• Place breadmaker on dry, stable surface away from heat and areas where
cooking grease or water may splatter on unit. Do not place near edge of
countertop.
Important: Your breadmaker will bake up at 2-lb. loaf. Do not put larger
quantities of ingredients into bread pan. Bread will not mix and bake correctly
and breadmaker may be damaged. (See MAXIMUM INGREDIENT AMOUNTS.)
• Before rst use, operate on Rapid White Course program to burn off
manufacturing oils. (Follow instructions in MAKING DOUGH & BAKING
BREAD.)
Note: During rst use, breadmaker may smoke and/or emit an odor from mineral
oils used in manufacturing. This is normal.
MAXIMUM INGREDIENT AMOUNTS
• Bread courses: approximately 4 cups
• Batter bread and prepackaged cake mixes: 4 cups
• Dough courses: 4
2
/3 cups
• Jam: 3 cups of fruit
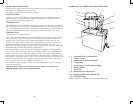
BREAD PAN TIPS
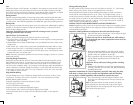
Inserting bread pan
Note: Remember to insert kneading paddle rst, then add all ingredients BEFORE
inserting the bread pan into baking chamber.
• When inserting bread pan into breadmaker, make sure to seat rmly in place.
Removing bread pan
• To remove bread pan from baking chamber, hold handle with an oven mitt and
lift gently.
Important: When you remove bread pan after baking, be sure to wear oven mitts
to prevent burning.
• After removing loaf (by turning bread pan upside down and shaking gently),
check to see that kneading paddle is removed from loaf. If it is stuck in bread,
use non-metal utensil to gently remove it, taking care not to scratch the kneading
paddle.
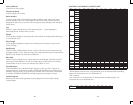
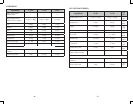
KNEADING AND BAKING COURSES
Note: If, at any time during bread making process, you need to turn breadmaker
OFF, press STOP button. Then unplug unit.
Note: During all courses except JAM, audible beep will sound to check dough
ball and scrape ingredients from sides of bread pan, add additional ingredients like
raisins, nuts or spices) or stir ingredients. Refer to KNEADING AND
BAKING COURSES charts to determine time that beep will sound.
Note: If bread is not removed immediately after baking and STOP button is not
pressed, controlled 60-minute Keep Warm cycle will begin for each Course
selection (except Deluxe Super Rapid, Batter Bread, Doughs and Jam). Although
this will help prevent bread from becoming soggy, for best results, remove bread
immediately after baking process is complete.
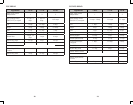
White Bread
Used for breads that primarily use white our, although some recipes may include
small amounts of whole wheat our.
Whole Wheat Bread
Used for recipes with signicant amounts of whole wheat or rye our, oats, or bran.
Whole wheat Course begins with rest period during which ours or grains absorb
liquid ingredients. Soaking causes our or grain to soften and helps ingredients to
combine. Generally, Whole wheat and multi-grain breads are shorter and denser
than white, French or fruit & nut breads.
French Bread
Traditionally, French bread has crispier crust and lighter texture than white bread.
Recipes usually do not include butter, margarine or milk.
Fruit & Nut Bread
Used for recipes that contain fruit juice, additional sugar or added sweet
ingredients such as coconut akes, raisins, dried fruit or chocolate. Baking
temperature is reduced to prevent burning.