


14
312028000
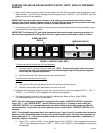
B. Press ‘‘AUTO BLEND 1’’ switch to fill No. 1 system product blender tank with product. ‘‘FILL 1’’ fault
message will go out when ‘‘AUTO BLEND 1’’ switch is pressed. When product blender tank is full, press
‘‘FILL 1’’ switch to prevent more product from entering tank. ‘‘OFF 1’’, ‘‘OFF 2’’, and ‘‘SYRUP 2’’ fault
messages will continue to be displayed.
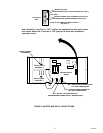
C. Open No. 1 product blender tank product sample valve (see Figure 2 and 6) and take sample (approxi-
mately 6-ounces) of product in a cup or glass.
NOTE: Temperature compensated hand-type refractometers (P/N 511004000) are available from The Cor-
nelius Company.
D. Check product BRIX with a temperature compensated hand-type refractometer. BRIX should read 13 ±
1. If BRIX is not within tolerance, adjust white syrup flow regulator for No. 1 syrup system as follows:
E. Turn regulator adjusting screw to the left (counterclockwise) no more than 1/8-turn at a time to reduce
syrup flow rate or turn screw to the right (clockwise) no more than 1/8-turn to increase flow rate.
F. Place container under No. 1 product sample valve. Open valve to purge product out of product blender
tank, line, and valve, then close valve. ‘‘OFF 1’’, ‘‘OFF 2’’, and ‘‘SYRUP 2’’ will continue to be displayed.
G. Press ‘‘AUTO BLEND 1’’ switch to run new batch of product into product blender tank. When product
blender tank is full, press ‘‘FILL 1’’ switch to prevent more product from entering product blender tank.
‘‘OFF 1’’, ‘‘OFF 2’’, and ‘‘SYRUP 2’’ fault messages will continue to be displayed.
H. Repeat steps C and D preceding to check product sample for BRIX.
I. Repeat steps F through H preceding until proper BRIX adjustment is achieved.
J. Repeat steps A through I preceding to adjust BRIX of dispensed product on No. 2 system. After com-
pleting BRIX adjustment on No. 2 system, only the ‘‘OFF 1’’ and ‘‘OFF 2’’ fault messages should contin-
ue to be displayed.
NOTE: Syrup systems may be sanitized at this time as instructed.
FILLING FREEZE CYLINDERS WITH PRODUCT
1. Open product shutoff valves, located in lines leading from product blender tanks to freeze
cylinders.
2. Press ‘‘AUTO BLEND 1’’ and ‘‘AUTO BLEND 2’’ switches to begin filling freeze cylinders. Open freeze cylin-
ders faceplates relief valves to bleed air from cylinders while filling with product, then close valves. Do not
relieve freeze cylinder pressure too fast or product will foam excessively in cylinder and lose carbonation.
CHECKING UNIT FOR SYRUP, CO
2
, OR PLAIN WATER LEAKS
1. Inspect the entire Unit and the entire system for syrup, CO
2
, or plain water leaks and repair if evident.
2. Install the Unit back and side panels.
3. Install Unit front access panel (see Figure 5) and secure with THREAD CUTTING SCREWS (item 16) and
WHITE SPACERS (ITEM 14).
4. Close front access door, then use a flat blade screwdriver to turn lock clockwise to lock the door.