


58312028000
1. Press “OFF 1” and “OFF 2” control switches to stop the refrigeration system and the beater drive motors.
2. Disconnect electrical power to the Unit.
3. Remove Unit back and both side panels as instructed.
4. Remove one bolt and two hex nuts and two lockwashers securing motor to Unit frame.
5. Very carefully, pull motor back off two mounting studs and disengauge motor shaft and plastic coupler from
freeze cylinder drive shaft.
6. Lower motor down to Unit bottom platform, then turn motor for access to it’s electrical wiring
cover plate.
7. Remove two screws securing the electrical wiring cover plate, then remove plate for access to electrical
terminals.
8. Tag beater drive motor electrical wiring for identification, then disconnect wiring from terminals.
9. Remove old beater drive motor from inside Unit.
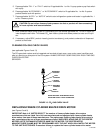
10. Remove plastic coupler from the old beater drive motor shaft and install on the new motor shaft. MAKE
SURE THE ALLEN-HEAD SET SCREWS ARE SECURELY TIGHTENED AND PROPERLY SEATED ON
THE SHAFT FLAT SURFACE.
11. Install new beater drive motor in the Unit by reversing removal procedure.
CAUTION: The new beater drive motor has a screw in the vent hole on top of the gear box
that must be removed before the motor is put into operation.
12. Remove screw from the vent hole on top of the beater drive motor gear box.
13. Install Unit back and both side panels by reversing removal procedures.
14. Restore the Unit to operation.
15. Refer to “PROGRAMMING FREEZE CYLINDER BEATER MOTORS INTO UNIT ELECTRONICS” in the
INSTALLATION section to program the new replacement beater motor into the Unit to match the Unit elec-
tronics.
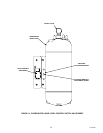
ADJUSTING CARBONATOR TANK LIQUID LEVEL
The carbonator tank liquid level (pump cut-in and cut-out) was adjusted at the factory and should require no fur-
ther adjustment. However, if incorrect setting is suspected, check and make necessary adjustments as follows:
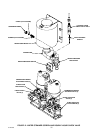
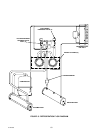
1. Remove Unit back and side panels as instructed for access to carbonator and carbonated water volume
sample valve (see Figure 6 and 14).
2. To check carbonator tank total fill; allow carbonator water pump motor to operate and fill tank with carbon-
ated water. After pump cycles off, disconnect electrical power from Unit.
3. Using container graduated in ounces, open carbonator carbonated water sample valve and completely
drain carbonator tank into container. Total carbonated water volume dispensed should be 40 to 58-ounces
maximum.
4. If total carbonated water dispensed is below 40 ounces, loosen screw securing level control switches ac-
tuator bracket (see Figure 14 ) and move actuator bracket up slightly. If more than 58 ounces, maximum of
carbonated water was dispensed, move actuator bracket down, then tighten screw. MAKE ADJUST-
MENTS IN SMALL INCREMENTS.
5. Connect electrical power to Unit and allow carbonator tank to fill with water until water pump cycles off.
6. Repeat steps 2 through 5 preceding as many times as necessary until correct carbonated water volume
adjustment is achieved.