


41
312028000
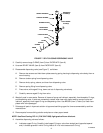
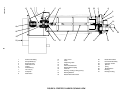
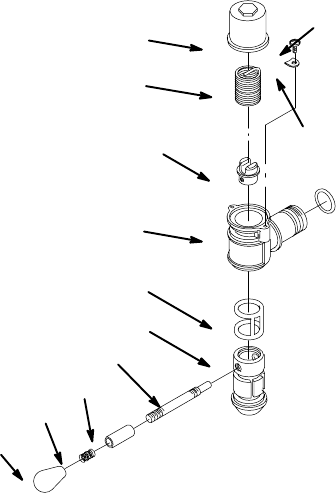
SPRING HOUSING
TORSION SPRING
SPRING FITTING
DISPENSING
VALVE BODY
CAGED O-RING
VALVE
LEVER
SLEEVE
SPRING
KNOB
RETAINING
SCREW(2)
HOLD-DOWN
PLATE(2)
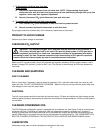
FIGURE 7. SELF-CLOSING DISPENSING VALVE
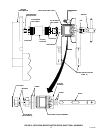
3. Carefully remove large O-RING (item 5) from FACEPLATE (item 8).
4. Unscrew RELIEF VALVE (item 9) from FACEPLATE (item 8).
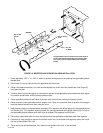
5. Disassemble dispensing valve (see Figure 7) as follows:
A. Remove two screws and hold-down plates securing spring housing to dispensing valve body, then re-
move housing.
B. Remove torsion spring from dispensing valve.
C. Remove knob, spring, sleeve, and lever from dispensing valve.
D. Remove spring fitting from dispensing valve.
E. Press valve, with caged O-ring, down and out of dispensing valve body.
F. Carefully remove caged O-ring from valve.
6. Wash all parts in warm water. Remove all traces of syrup and lubricant, especially from faceplate, O-rings,
and dispensing valve. If parts are excessively coated, wipe clean with paper towel to remove syrup and
lubricant, especially from caged O-ring and dispensing valve. Use BRUSH (item 3, Table 3) to clean face-
plates relief valve passages.
7. Submerge all parts in 4 percent solution of approved sanitizing agent for time recommended by sanitizer
manufacturer.
8. Remove parts from sanitizing solution and place on clean paper towels.
NOTE: Use Dow-Corning DC-111 (P/N 321471000) light grade silicone lubricant.
9. Assemble dispensing valve as follows:
A. Lubricate caged O-ring. Carefully install caged O-ring on valve from straight end (opposite tapered
end). Lubricate grooves in which O-ring rides to fill in all void areas around O-ring.