


PCL
2-67
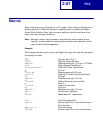
Macros
When creating a macro, first assign it an ID number. If this number is identical to an
existing macro ID in RAM, the old macro is deleted when you specify the Macro
Control Start Definition. Next, start the macro definition, send the contents of the
macro, and stop the macro definition.
Note: Although a macro may be called or executed from within another macro
(nesting), a macro cannot be defined within another macro definition. Each
macro must be defined separately.
Example:
This example creates a macro to print the Wigit Corp. logo, then calls the logo macro
in the body of a letter.
ESC
&f1Y |Set the macro ID to 1
ESC
&f0X |Start the macro definition
ESC
&a+72H |Relative move right 1/10 inch (+72/720th)
ESC
(8U |Select Roman-8 symbol set
ESC
(s1p18v0s3b4101T |Select CG Times 18 point bold
W |Print W
ESC
&a-21.6H |Relative move left 0.03 inch
ESC
(s12v1S |Select (CG Times) 12 point (bold) italic
igit |Print igit
ESC
&a+72H |Relative move right 1/10 inch
ESC
(s18v0S |Select 18 point and turn off italic
C |Print C
ESC
(s12v1S |Select 12 point italic
orp. |Print orp.
ESC
&a+72H |Relative move right 1/10 inch
ESC
&f1X |End of macro definition
ESC
&f10X |Make Macro ID 1 permanent
...
...
From:
|Print the header From:
ESC
&f1y3X |Set the macro ID to 1 and call the macro
... |Print the letter
Thank you for ... |Print the closing
ESC
&f1y3X |Set the macro ID to 1 and call the macro
...