


Page
16
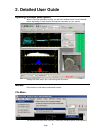
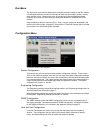
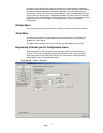
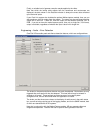
Once you have selected a template layout, the window below will show all currently
existing instances of that template layout. It is possible that not all templates will have
been used, so for some, the window will be empty.
If there are existing instances, they can be edited. To create a new instance, select the
‘Add new instance’ button. A new instance appears, with the window panes unassigned,
and the whole thing highlighted in dark red, and an individual pane highlighted in a lighter
red.
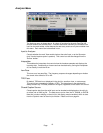
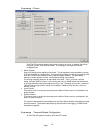
Similarly you can copy an existing instance including all of its settings, in order to produce
a similar layout, and you can delete instances no longer required.
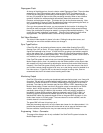
To edit a new or existing instance, start by double clicking one pane within the instance,
or alternatively right click over the pane, and select ‘Change pane type’. From the popup
window, select your choice of waveform, vectorscope etc. Repeat this process for the
other panes within the instance.
Initially the new instance will have a default name shown directly above it, of the form
‘layout 3’. Double click on this name, and a popup appears that lets you rename the
instance.
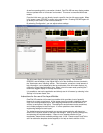
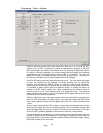
Assigning Settings
By default, no specific settings are assigned to the various portions of the full screen
view. So when you enter a full screen view, each pane will adopt the current settings of
the related window within the normal environment. For example, the waveforms in a
given full screen view could show YUV. Go back to the windows environment, and
change the waveform display to RGB, and then go back into the full screen display. If no
settings have been assigned, then the waveforms will now be showed in RGB format.
However, if, for the given full screen view, the waveforms had been assigned to YUV,
they would always be YUV, regardless of the setting within the Windows environment.
To assign settings to a pane, select the pane, and click ‘Assign’ from the ‘Pane settings’
section. Applicable settings include the choice of YUV or RGB, and whether the
waveforms are shown at normal size, or are stretched to a larger size.
If at a later stage you wish to change the settings previously assigned, then ‘Load’ the
pane settings back into the Windows version, change them to suit your requirement, and
re ‘Assign’ them back.
Similarly it is possible to entirely ‘Remove’ the pane settings if required.
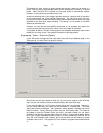
As well as assign Pane settings, it is possible to separately assign the Engineering
settings, the ROI settings, and the Look and Feel settings.
The Engineering settings includes things like video standard.
ROI settings includes things like all line versus single line view, which can also be
configured to look at specific lines. This is very useful, as three identical views could be
configured, except that the first view is All line, the second view is only the first active line,
and the third view could be only the last active line. With these views assigned to
separate hotkeys on the keyboard, it is very fast to switch between these different
settings.
The Look & Feel settings include things like the colour of the waveforms.
Be warned that the various assignments can still be in force after switching from a full
screen view with an assignment. For example, if F4 switches to a given arrangement of
panes, but also switches to NTSC, then the whole unit will remain in NTSC until you
change it back, or select another hotkey that has an Engineering setting assigned to it.
So really the Engineering settings should either never be assign, or should be assigned
to every possible hotkey.
Whilst certain controls can be assigned to different full screen displays, greater versatility
and greater ease of use can exist by using Presets (see page 66) to control simple
functions like switching between single line and multi line view.
Having chosen your full screen format, chosen displays for each pane, and configured
each pane to suit your requirements, the last thing to do is to assign a hot key to that
layout. Right click over the layout image, and select ‘Assign hot key’ from the menu that
will appear. When the hot key dialogue appears, press the key or key combination that