


The ice dispenser will not operate properly
Check if ... Then ...
The freezer door is not closed completely. Push the door firmly shut. If it will not shut all the way,
see "The doors will not close completely" on page 34.
The ice bin is not installed correctly. Push the ice bin in all the way. If the ice bin does not
go in all the way, it may not be put in straight. Pull it
out and try again.
The wrong ice has been added to the bin. Use only cubes produced by the current ice maker.
If other cubes have been added, remove all cubes
and check to see that none have become stuck in
the delivery chute.
The ice has frozen in the ice bin. Shake the ice bin to separate cubes. If cubes do
not separate, empty bin and wait 24 hours for ice
to restock.
The ice has melted around the auger (metal Dump the ice cubes and clean the ice bin completely.
spiral) in the ice bin. Allow 24 hours for the ice maker to re-stock. Do
not try to remove the melted ice with a sharp object.
You could damage the ice bin.
Ice is stuck in the delivery chute. Clear the ice from the delivery chute with a plastic
utensil. Do not use anything sharp to remove the ice.
You could cause damage.
There is no ice in the bucket. See "The ice maker is not producing ice" on page 30.
The dispenser arm has been held in too long.
Release dispenser arm. Ice will stop dispensing when
the arm is held in too long. Wait three minutes for
dispenser motor to reset before using again. (For
future use, take large amounts of ice directly from
the ice maker so that the dispenser arm is not held
in too long.)
The doors are not level
Check if ... Then ...
The refrigerator is not level. Level the refrigerator. Refer to "Leveling and door
alignment" on page 4.
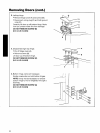
The doors were removed during the product Remove and replace the doors according to removal
installation and were not properly replaced, instructions that are supplied with your refrigerator
or call for service.
The refrigerator is level and the doors were not Refer to "Leveling and door alignment" on page 4.
removed during product installation.
3!