


Ⅲ
B R E A D
We suggest starting your bread baking with this White Bread Recipe. Fo l l ow each step carefully.
These steps have been written to eliminate the most common errors in bread maker baking and may
be helpful for any recipe.
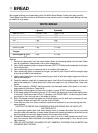
WHITE BREAD
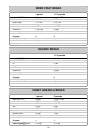
1 pound 2 pounds
water 80°F/27°C 1/2 cup + 3 T B L 1 cup + 5 T B L
o i l 4 tsp 2 T B L
s u g a r 1 1/2 T B L 2 T B L
s a l t 1 tsp 2 tsp
d ry milk 1 T B L 2 T B L
bread flour 2 1/4 cups 4 cups
a c t i v e dry ye a s t 1 tsp 1 1/4 tsp
P ro g r a m 1 1
Insta Program 4 ye a s t : 2 tsp 2 1/4 tsp
- 17 -
Method
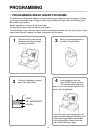
1. Remove the bread pan from the bread maker. Attach the kneading blade onto the shaft. Make
sure all ingredients, except water, are at room temperature.
2. Use a liquid measuring cup to measure the water (80°F/27°C/baby bottle temperature) and pour
into the bread pan.
3. Use a measuring spoon to measure the oil and add to the bread pan.
4. Use a measuring spoon to measure the sugar, salt and dry milk; level off with the straight edge
of a knife and add to the bread pan.
5. Lightly spoon bread flour into a dry measuring cup; level off with the straight edge of a knife and
add to the bread pan.
6. Carefully measure yeast with a measuring spoon; level off with the straight edge of a knife and
add to the bread pan. If using delay timer, make sure yeast is on top of bread flour, away from
liquids.
7. Place the bread pan (FRONT marking forward) into the bread maker. Push down on rim until it
snaps securely into place. Close the lid.
8. Select Basic Light program and set timer to delay, or press START for immediate start.
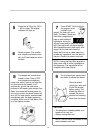
9. At the beep during the kneading process (3:16), check the dough ball.It should be slightly tacky
to the touch. Add more water or flour if necessary; see DOUGH BALL. At this time, push down
any dough or flour that may be on the sides of the pan.
10. When the beeper sounds the bread has finished baking and the hold warm process will start.
The display window will read 0:00, and the colon will flash.
11. Press stop and use oven mitts to carefully remove the bread pan at any time during the hold
warm process.
CAUTION: THE BREAD PAN, KNEADING BLADE AND BREAD WILL BE VERY HOT.
USE OVEN MITTS.
12. Turn bread pan upside down and shake several times to release the bread. Do not use metal
utensils inside the bread pan or bread maker. Remove the kneading blade and allow loaf to cool
standing upright on wire rack approximately 20 minutes before cutting.
13. If bread loaf does not easily release from pan, allow it to sit on a heat resistant surface 5 min-
utes, then remove. When the bread has completely cooled, approximately 1 hour, store in an air
tight container.
14. UNPLUG UNIT BEFORE CLEANING. DO NOT IMMERSE THE BREAD PAN IN WATER. See
CLEANING AND STORING.