


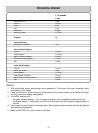
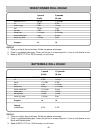
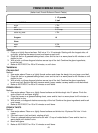
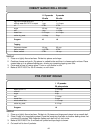

Ⅲ
DOUGHS . . . AS EASY AS 1 - 2 - 3
1. Add ingredients to the bread pan in the order listed. Refer to Helpful Hints for Bread and Dough for
measuring information. Place the bread pan in the bread maker.
2. Close the lid. Select Dough program and press START.
3. Remove the dough from the bread pan when the beeper sounds. Follow shaping and baking instruc-
tions.
• If you allow the dough to remain in the bread maker after the cycle is complete, it may over rise and
damage the machine.
• Rising times for dough after it is shaped and placed in a baking pan will vary due to recipe, tempera-
ture and humidity level of your kitchen.The optimum temperature of the room for rising is 80°-
85°F/27°-29°C. Rising is the most essential feature in bread making. After the dough comes out of the
bread maker, the dough ferments and rises before punching and resting.The gluten becomes pliable
and elastic with a soft, smooth quality. Fermentation conditions gluten, develops flavor and leavens
the product.
Dough has doubled in bulk when an indentation remains after the tip of a finger is pressed lightly and
quickly into the dough.If the indentation springs back, cover and let rise a few more minutes and
check again. After punching down and dividing dough, cover and let rest 10 minutes. Resting allows
the gluten to relax and makes handling easier. Then shape the dough as desired.
Sometimes a double rising is beneficial especially for whole grain or 100% whole wheat bread. Let
the dough rise once, punch down, let rise again, punch down, let rest 10 minutes and shape.
Crust Treatments (use only with dough pro g r a m )
Always allow optimum rising of shaped dough.Use a pastry brush to apply glaze. Bake as directed.
Egg Yolk Glaze — For a shiny golden crust, mix 1 slightly beaten egg or egg yolk with 1 tablespoon
water or milk.
Egg White Glaze — For a shiny, chewy crust, mix 1 slightly beaten egg white with 1 tablespoon water.
L i g h t l y Floured
Sprinkle enough flour onto work area so that the dough can be handled without sticking.
Shaping Rolls
Cloverleaf Rolls — Shape into 1/2 inch balls. Place 3 balls in each greased muffin tin and let rise until
double in size.
Crisscross Rolls — Shape into balls. Combine two of the balls and roll into a 1/8 inch thick square. Cut
strips 1/8 inch wide and place one strip across the top of each ball. Repeat this process, placing the
second strip in the opposite direction across the top of each ball.
Traditional Rolls — Shape into balls. For “pull apart” rolls, place dough balls with sides touching in a
baking pan. For “individual” rolls place dough balls 2 inches apart on a baking sheet.
Pan Sizes For Traditional Pull-Apart Rolls —
For a 1 lb. (9 rolls) recipe, use an 8 x 8 inch baking pan.
For a 1.5 lb. (18 rolls) recipe, use two 8 x 8 inch baking pans.
For a 2 lb. (24 rolls) recipe, use a 9 x 13 inch baking pan.
39