


A-12 APPENDIX - REPLACING OVEN COMPONENTS
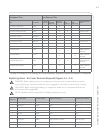
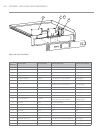
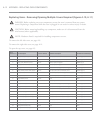
Figure
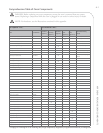
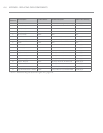
Reference #
Item Description Item Part Number Hardware Description Hardware Part Number(s)
1 Hinge, Bracket, Slide, LHS I5-9196 Nut, Keps, Hex, #8-32, Ext Tooth, Cres 102962 (qty 4)
2 Hinge, Bracket, Slide, RHS I5-9195 Nut, Keps, Hex, #8-32, Ext Tooth, Cres 102962 (qty 4)
3 Hinge, Cam, Weldment, LHS I5-9313 Washer, Nylon, Hingepin C0504 (qty 1)
4 Hinge, Cam, Weldment, RHS I5-9314 Washer, Nylon, Hingepin C0504 (qty 1)
5 Hinge, Guide, Switch Slide, Lower I5-9316 Screw, 10-32 x 3/8 lg, PFLH, 100 Deg, SS 101401 (qty 2)
6 Hinge, Guide, Switch Slide, Upper I5-9315 Nut, Keps, Hex, #8-32, Ext Tooth, Cres 102962 (qty 4)
7 Hinge, Gusset, LHS I5-9178 Nut, 1/4 - 20, Serr, Hex Flange, Plated Steel 100906 (qty 2)
8 Hinge, Gusset, RHS I5-9179 Nut, 1/4 - 20, Serr, Hex Flange, Plated Steel 100906 (qty 2)
9 Hinge Module, Base I5-9193 None None
10 Hinge, Torsion Bar I5-9144 Spacer, Adjustment Call TurboChef
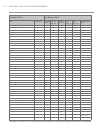
11 Hinge, Weldmt, Ctrblnce Brkt, LHS I5-9326 Screw, 10-32 x 3/8 lg, PFLH, 100 Deg, SS 101401 (qty 3)
12 Hinge, Weldmt, Ctrblnce Brkt, RHS I5-9327 Screw, 10-32 x 3/8 lg, PFLH, 100 Deg, SS 101401 (qty 3)
13 Magnetron (Left) NGC-3015 Screw, Sh Mtl #8 x 1/2, Serrated PHTRH 101688 (qty 4)
14 Magnetron (Right) NGC-3015 Screw, Sh Mtl #8 x 1/2, Serrated PHTRH 101688 (qty 4)
15 Thermostat, Magnetron (Left) 102070 Screw, Sh Mtl, Drill Point, 6-32 x 3/8, PPHD, Zinc 101684 (qty 2)
16 Thermostat, Magnetron (Right) 102070 Screw, Sh Mtl, Drill Point, 6-32 x 3/8, PPHD, Zinc 101684 (qty 2)
17 Waveguide (Left) I5-9330 Nut, Keps, Hex, #10-32, Ext Tooth, Cres 102963 (qty 9)
18 Waveguide (Right) I5-9330 Nut, Keps, Hex, #10-32, Ext Tooth, Cres 102963 (qty 9)
19 Waveguide Gasket (Left) I5-9331 None None
20 Waveguide Gasket (Right) I5-9331 None None
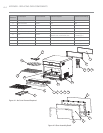
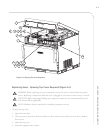
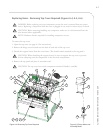
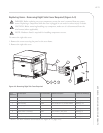
Replacing Items - Removing/Opening Multiple Covers Required (Figures A-10, A-11)
DANGER: Before replacing any oven component, ensure the oven is removed from any power
source. Replacing a component while the oven is plugged in can result in serious injury or death.
CAUTION: Before removing/installing any component, make sure it is disconnected from the
wire harness (where applicable).
NOTE: Hardware listed is required for installing component to oven.
To remove the left side cover, see page A-9.
To remove the right side cover, see page A-11.
To open the top cover, see page A-5.