


14
15
If using Prepackaged Bread Mixes, refer to
page R37.
Note
Mound the flour into the pan, make a small
hollow in the centre and place the yeast in
the hollow. This is important when using the
‘PRESET TIMER’ because if the yeast comes
in contact with the water and is activated
at some length of time before kneading
commences, the bread may not rise.
Note
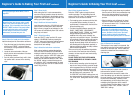
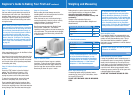
Step 4: Return the bread pan to the machine
Insert the bread pan into the machine as follows:
Place the bread pan into the baking chamber,
with the word ‘FRONT’, on the top edge of
the bread pan, facing towards the front of the
bread machine.
Locate the drive mechanism of the pan
directly into the drive mechanism in the base
of the baking chamber.
Push the bread pan down firmly until it clicks
into position and is secured in the retaining
clips.
1.
2.
3.
Step 5: Close the lid
After closing the lid, it is not recommended to
open the lid during operation except to check the
consistency of the dough in the kneading cycle or
to glaze and add seeds to the top of the loaf in the
baking cycle (refer to page R43).
Step 6: Switch on the bread machine
Insert the power plug into a 230/240V volt power
outlet. Switch on at the power outlet. When the
Baker’s Oven is plugged in and switched on, the
LCD screen will automatically flash ‘000’ and one
long ‘beep’ will sound.
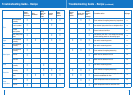
Step 7: Select the setting
Press the ‘SELECT’ button and the LCD screen
shows 1 1KG MEDIUM. Continue pressing the
‘SELECT’ button until the desired setting (between
2 and 11) is selected (refer to page 9-10 for
description of each setting).
Step 8: Select the loaf size or crust colour
When a bread setting is selected the loaf size
and crust colour will default to 1KG MEDIUM. If
wishing to select the smaller loaf size or a darker
or lighter crust, press the ‘LOAF SIZE’ button once
to select 750g (0.75KG) and press the ‘CRUST’
button once for DARK and twice for LIGHT. When
the ‘DOUGH’ setting is selected the dough size
will default to 1KG. If a smaller quantity of dough
is required, press the ‘LOAF SIZE’ button once to
select 750g (0.75KG).
Step 9: Start the bread machine
Press the ‘START’ button to begin the bread
machine operation. The total setting time will
appear in the LCD screen. The setting time will
count down in one-minute increments.
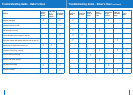
The kneading cycles commence with the Add-
in Ingredient Beeper sounding 8 ‘beeps’ at
approximately 5 minutes before the end of the
second kneading cycle.
The Add-In Ingredient Beeper sounds in the
‘BASIC’, ‘BASIC RAPID’, ‘WHOLEWHEAT’,
‘WHOLEWHEAT RAPID’, ‘FRENCH’ and ‘SWEET’
settings indicating the time to add any
additional fruit, nuts, herbs, chocolate, etc.
required or as specified in recipes. The addition
of ingredients at this time assists with keeping
fruits, etc. whole, rather than being mashed
through the bread dough. While the machine is
still kneading add the ingredients gradually in
batches, allowing the dough to slowly combine
with the added ingredients.
Take care not to drop the additional ingredients
over the side of the bread pan into the baking
chamber, as these may burn and smoke during
the baking cycle.
DO NOT PRESS THE ‘STOP’ BUTTON WHEN
ADDING INGREDIENTS AS THIS WILL CANCEL
THE PROGRAM.
At the end the kneading cycles the dough will
start to rise. During the rising cycles the dough
will be degassed twice by the blade moving at
the end of the first and second rising cycles.
The dough rises fully in the third rising cycle,
then the baking cycle commences. The
‘GLUTEN FREE’ and ‘DOUGH’ settings have only
one rising cycle with no degassing of the dough.
The ‘YEAST FREE’ setting does not have a rising
cycle.
•
•
•
During the baking cycle steam may be emitted
from the vents on the lid and condensation may
form on the viewing window for a short time.
This is normal and part of the bread making
process.
When the baking cycle is finished, the bread
machine will sound 3 double ‘beeps’ and the
LCD screen will show ‘0:00’. The baked bread
is now ready to remove.
If the power is accidentally turned off for
30 minutes or less during the bread making
process, the Baker’s Oven has a 30 minute
memory function, that will automatically
resume bread making when power is restored.
Note
Step 10: Remove the bread pan
The bread pan is now ready to be removed. Use
oven mitts to open the lid and carefully grasp the
handle of the hot bread pan. Pull the bread pan
upwards to release from drive mechanism and
retaining clips.
If the hot bread pan is placed onto a bench or
table ensure the surface is heat proof.
It is recommended to remove the bread at the
end of the baking cycle to retain the crispness of
the crust. However, if you do not wish to remove
the hot bread immediately, the Baker’s Oven
will automatically go into the Keep Warm cycle,
maintaining the temperature of the bread for
up to 60 minutes. The ‘Keep Warm’ cycle is not
available on ‘YEAST FREE’, ‘DOUGH’, ‘JAM’ or
‘BAKE ONLY’ settings.
•
•
Beginner’s Guide to Baking Your First Loaf continued Beginner’s Guide to Baking Your First Loaf continued