


6-9
Maintenance 6
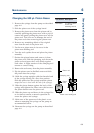
Changing the Syringe Piston and Piston Noses
Changing the 500 µL Piston Noses
1. Remove the syringe from the pump as described
page 6-4.
2. Slide the piston out of the syringe barrel.
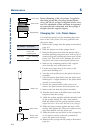
3. Remove the piston nose from the piston rod by
carefully pinching the piston nose with a pair of
cutters and gently pulling the piston nose off the
piston rod. Take care not to damage the end of
the piston rod when removing the piston nose.
4. Remove any remaining debris of the original
nose from the end of the piston rod.
5. Put the new piston nose in its recess in the
piston nose holding tool.
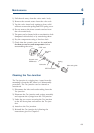
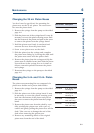
6. Turn the tool upside down and place the piston
assembly.
7. Slacken the piston button and remove it from
the piston rod. Slide the clamping tool down the
piston rod and press the 2 tools firmly against
each other. A slight rotation of the clamping tool
ensures a correct fitting.
8. Remove the tools away from the piston assembly.
9. Dip the piston nose in distilled water and slide
the piston into the syringe.
10. Hold the syringe upright with the threaded end
of the syringe resting on a flat, clean surface.
Slide the piston into the syringe until the piston
stops (the nose is level with the end of the syringe).
11. Slide the piston button against the body of the
syringe and tighten the Allen screw that secures
the piston button onto the piston rod.
12. Slide the piston up and down in the syringe five
or six times to ensure a smooth operation be-
tween the piston and syringe.
13. Make sure of the presence of the plastic cover
when re-mounting the syringe on the pump as
recommended below.
14. Remount the syringe on the pump as described
page 6-4.
Part Number Description
F4015064 5 x 500 µL piston
noses and
mounting tool kit
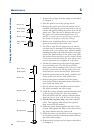
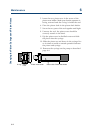
Piston rod
Clamping tool
Piston
nose
Piston nose holding tool