


15EN
English
Control Ring
To set the Clock, Timer for delayed cooking, Cooking Time and choose the desired Menu •
and Submenu.
You can move your nger up or down on the left or right side of the control ring to adjust
settings (e.g. the clock, the timer for delayed cooking and the cooking time) or to select the
desired menu.
Press and hold one of the 4 points to move the settings forward or backward quickly (Fig. 6).
A ashing button appears on the control panel indicates that you can press this button to •
go to the next step.
4 Using the appliance
Before Cooking Start
1
Install the detachable steam vent cap and make sure it is well positioned.
2 Press the lid release button to open the lid. Add the required ingredients and/or water to the
inner pot then place pot in Variety Cooker (Fig 11).
Make sure the pot is placed properly and handles of the pot are aligned with the grooves in •
the main body.
Make sure the heating element and outside of inner pot are clean and dry. If the pot is •
returned to cooker when wet or when debris is present it will damage the appliance, causing
it to malfunction.
3 Close the lid of the Variety Cooker and make sure the “click” sound is heard.
Do not close the lid with force. If the lid does not close properly, check if inner pot is •
placed correctly.
4 Put the plug in wall socket and switch on the mains.
Make sure body plug and power plug are well positioned.•
To prevent breakdown, do not start cooking program when inner pot is empty.•
Menu Function
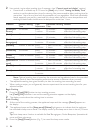
Steam Cooking Menu
Preparation
1 Measure 3 cups of water with measuring cup provided and pour them into inner pot.
It takes approx. 8 minutes for 3 cups of water to come to the boil. The table below is a •
steaming guide for reference; cooking time may vary depending on the temperature, quality
and amount of the ingredients.
Note: The amount of water required is determined by the amount of food to be steamed.
Please readjust the water volume accordingly.
2 Put steam tray in steam basket. The line on steam tray has to point to the mark on steam basket.
(Fig. 12)
3 Put the assembled steam basket with steam tray in inner pot (Fig. 13).
4 Put the food for steaming in the steam basket.
Note: To ensure even steaming, spread out the food evenly and do not pile it up.