


Troubleshooting 57
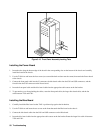
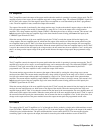
Removing the Front Panel Assembly
1. Carefully unplug the front panel cable from the J3 connector on the Power board.
2. Spread the bottom of the chassis away from the front panel assembly and lift the assembly out of the chassis.
Removing the Power Board
1. Carefully unplug the front panel cable from the J3 connector, the bias board cables from the J301 and J302 connectors,
and the fan cable from the J102 connector on the Power board.
2. Use the T10 driver and remove the four screws (two toward the back and two near the center) that attach the Power
board to the chassis.
3. Lift up on the top edge of the Power board and carefully remove the board from the chassis.
Removing the Bias Board
Removing the Front Panel assembly first makes it easier to remove the Bias board.
1. Carefully unplug the bias board cables from the J401 and J402 connectors on the Bias board. If you have not already
done so, carefully unplug the front panel cable from the J3 connector on the Power board.
2. Use the T10 driver and remove the two screws at the front that attach the Bias board to the chassis.
3. Lift up on the front edge of the Bias board and carefully remove the board from the chassis.
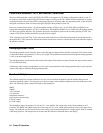
Removing the Front Panel Board
You must first remove the Front Panel assembly before you can remove the Front Panel board.
1. Separate the two halves of the front panel assembly by releasing the four locking tabs with the flat-bladed screwdriver
(see figure 3-15).
2. Insert the screwdriver into the areas indicated on the figure and press against the tabs to release them.
3. Once separated, you can easily remove the front panel board from the front panel assembly.
4. You can also easily remove the latching mechanism once the front panel assembly is separated.