


Always unplug unit and allow to cool completely before cleaning.
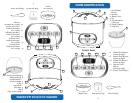
1. Remove the inner cooking pot. Wash it in warm, soapy water using a sponge
or dishcloth.
2. Rinse and dry thoroughly.
3. Repeat process with steam tray and other provided accessories.
4. Wipe the underside of the lid with a warm, damp cloth. Dry with a soft cloth.
5. Wipe the body of the rice cooker and the underside of the lid clean with a
damp cloth.
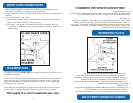
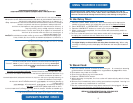
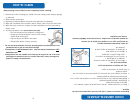
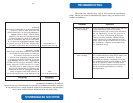
6. To clean the steam vent (clean after each use):
• Pull out the steam vent as shown in Diagram 1.
• Empty and wash the steam vent in warm, soapy
water. Rinse thoroughly.
• Dry the steam vent with a soft cloth.
• Reinsert the steam vent for next use.
• Do not use harsh abrasive cleaners, scouring pads or products that are not
considered safe to use on non-stick coatings.
• This appliance is NOT
dishwasher safe. Inner pot and accessories are NOT
dishwasher safe.
• Always make sure the outside of the inner pot is dry prior to use. If the inner
cooking pot is returned to the rice cooker when wet, it may damage this
product, causing it to malfunction.
8
8
Desconecte siempre la unidad y deje que se enfríe completamente antes de
limpiaria.
1. Saque la cacerola interna. Lávela con agua tibia y jabón, usando una
esponja o toalla para platos.
2. Enjuáguela y séquela perfectamente.
3. Repita este proceso con la charola para vapor, la ventanilla de vapor y con
los otros accesorios que se proporcionan.
4. Limpie el cuerpo de la olla arrocera y la parte inferior de la tapa con una
toalla húmeda.
5. Para limpiar la ventanilla de vapor:
• No utilice limpiadores abrasivos ásperos.
• No sumerja en agua o en cualquier otro líquido la olla exterior.
• No deberá meterse en lavavajillas. La cacerola interna TAMPOCO deberá
lavarse en lavavajillas.
COMO LIMPIAR EL APARATO
HOW TO CLEAN
Diagram 1
Hay que limpiar la ventanilla de vapor
después de cada uso.
1. Remueva la ventanilla de vapor como se
muestra en el Diagrama 1.
2. Vacié y lave la ventanilla de vapor con
agua tibia y jabón y enjuague.
3. Seque con un trapo seco.
4. Re inserte la ventanilla de vapor para su
próximo uso.
Diagrama 1