


30
1
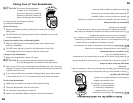
Attach the kneading blade in the bread pan.
2
Place ingredients into the bread pan in the following order:
water, butter or margarine, sugar, milk powder, salt and flour.
3
With finger, make a small indentation on one side of the flour.
Add yeast to indentation, making sure it does not come into contact
with the liquid ingredients.
4
Carefully insert bread pan into breadmaker and gently close the lid.
5
Plug the power cord into a wall outlet.
6
Press the Menu button until the “Basic” program is selected.
7
Press the Color button for the desired crust color.
8
Press the Loaf button to select the desired size loaf
(1.5-pound or 2-pound loaf).
9
Press the Start button.
10
When the baking cycle is complete, press the stop button.
11
Open the lid and while using oven mitts, firmly grasp the handle
of the pan, twist out and gently pull up and out of the machine.
☞
C
AUTION
:
The breadmaker and pan may be very hot!
Always handle with care.
12
Unplug the breadmaker and let bread cool before removing
from baking pan.
13
After the breadmaker and bread pan have cooled down, use non-
stick spatula to gently loosen the sides of the bread from the pan.
14
Turn bread pan upside down onto a wire cooling rack or clean
cooking surface and gently shake until bread falls out onto rack.
15
Turn bread right side up and cool for about 20 minutes
before slicing.
❃
Important:
After a baking cycle, the breadmaker will not operate until
it has cooled down
.
30
1
Fixez la palette dans le moule à pain.
2
Placez les ingrédients dans le moule dans l’ordre suivant : eau, beurre
ou margarine, sucre, lait en poudre, sel et farine.
3
Du bout du doigt, faites un renfoncement dans la farine, sur l’un des
côtés, et mettez-y la levure en faisant bien attention qu’elle n’ait aucun
contact avec les ingrédients liquides.
4
Placez délicatement le moule dans le robot boulanger et fermez le
couvercle doucement.
5
Branchez l’appareil sur une prise de courant.
6
Appuyez sur la touche «Menu» pour choisir le programme «Basic»
.
7
Choisissez la couleur de la croûte à l’aide de la touche «Color».
8
Appuyez sur la touche «Loaf» pour choisir la taille souhaitée
(pain de 1,5 lb ou de 2 lb).
9
Appuyez sur la touche «Start».
10
Lorsque la cuisson est achevée, appuyez sur la touche «Stop».
11
O
uvrez le couvercle et, tandis que vous portez des gants de cuisinier,
saisissez l’anse et sortez le moule en le tournant légèrement
.
☞
A
TTENTION
:
Le robot boulanger et le moule seront chauds!
Manipulez-les toujours très prudemment.
12
Débranchez le robot et laissez refroidir le pain avant de le démouler.
13
Une fois le robot boulanger et le moule refroidis, utilisez une spatule
antiadhésive pour détacher le pain des parois du moule.
14
Retournez le moule au-dessus d’une grille ou d’une plaque et secouez
délicatement le moule jusqu’à ce que le pain se démoule.
15
Remettez le pain à l’endroit et attendez une vingtaine de minutes avant
de le trancher.
❃
Important:
À la fin d’un cycle de cuisson, le robot boulanger ne pourra
recommencer à fonctionner que lorsqu’il aura refroidi
.