


Chapter 7 Mixing and Exporting Your Project 67
Automating Your Mix
At this stage, you’ve seen how many controls and parameters are available in the
channel strips, and several plug-ins. Changes that you make to virtually all of these
controls and parameters can be recorded and played back, just like your MIDI and
audio performances. This allows you to create complex, animated mixes—with
automatic channel mutes, signals that pan from side to side, synthesizer filter sweeps,
channel groups slowly fading in or out, and much, much more.
Recording and playback of these changes is known as mix automation. There are
several ways to do this in Logic, but the easiest, and most powerful method is with
track automation. As the name suggests, the automation information is stored on
automation tracks in the Arrange window. These tracks are independent of MIDI and
audio regions.
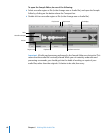
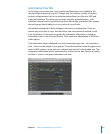
Track automation data is displayed on a semi-transparent gray area—an automation
track—that runs the length of your project. The audio waveforms of audio regions, and
notes in MIDI regions, can be seen at a reduced contrast level in the shaded area. The
automation information itself is represented by colored curves, dots (known as nodes)
and lines—shown in the gray automation track lane.