OPERATION AND SERVICE PROCEDURES
(SLIDE IN MODELS)
RC231002 Rev. 3 24
ELECTRONIC CLOCK/TIMER
The Clock/Timer offers a time-of-day clock with a PM
designation, a Minute Timer with up to nine (9) hours and
fifty-nine (59) minutes, and cook and stop functions. The
clock and timer are set up with up and down variable speed
"slew" entry.
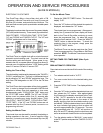
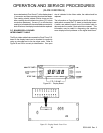
The display board consists of a vacuum fluorescent display
(VFD) with pushbutton entry. There are six (6) pushbuttons:
"MINUTE TIMER", "COOK/CLEAN TIME", "STOP TIME",
"UP" and "DOWN" and "CANCEL/CLOCK". The "UP" and
"DOWN" pushbuttons are for time setting.
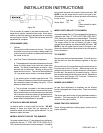
Figure 56 - Electronic Clock/Timer
The Clock/Timer is a digital clock with a minute timer and
automatic control cooking cycle. The clock is set via the
function setting and slew controls. When power is con-
nected to the unit, or a power failure of longer than three (3)
seconds occur, the display will show "12:00" flashing at the
rate of 1/2 second ON and 1/2 second OFF.
Setting the Time-of-Day
The clock setting is achieved by depressing the "CANCEL/
CLOCK" pushbutton first. Then key in the desired time of
day by using the "UP" and "DOWN" pushbutton keys. The
clock has a PM designation on the VFD for the PM time
setting.
The Clock/Timer also incorporates military timing capabili-
ties. In order to change from the standard AM/PM clock
operation to military time clock operation or vice versa,
simultaneously press "COOK/CLEAN TIME" button and
the "STOP TIME" button. NOTE: The "UP" and "DOWN"
buttons must be pressed within five (5) seconds after
selecting or pressing any timing function button ("CAN-
CEL/CLOCK", "MINUTE TIMER", "COOK/CLEAN TIME",
"STOP TIME"). If the "UP" and "DOWN" buttons are not
pressed within the five (5) second period, incorrect or no
programming will occur.
Setting the Minute Timer
The minute timer can be used for precisely time baking or
broiling operations in the oven. It can be used for timing
from one (1) minute up to nine (9) hours and fifty-nine (59)
minutes.
To Set the Minute Timer:
1. Display the "MINUTE TIMER" button. The timer will
display "0:00".
2. Press the "UP" button until the desired time period is
displayed, and release the "UP" button.
The minute timer is now programmed. After approxi-
mately five (5) seconds the timer display will revert
back to the Time-of-Day while continuing to count
down the programmed time. An alarm will sound
when the timer reaches "0:00". Press the "MINUTE
TIMER" button to silence the alarm. To check the
remaining time in the program, simply press the
"MINUTE TIMER" button.
The Minute Timer can also be used when the Clock/
Timer is programmed for a Timed Bake or Self-Clean
operation. NOTE: The Minute Timer does not control
oven operation.
SETTING TIMER FOR TIMED BAKE (Bake Cycle
Only)
SEMI-AUTOMATIC OPERATION
Oven starts at once and shuts off at the end of the cooking
cycles.
1. Turn selector switch knob to "AUTO".
2. Turn oven control knob to the desired baking tem-
perature.
3. Press the "STOP TIME" button. The display will show
"0:00".
4. Press the "UP" button to set the desired stop time, and
then release the "UP" button. After approximately
five (5) seconds, the display reverts back to the Time-
of-Day, "AUTO" appears on the left of the display
along with the oven indicator in the center of the
display signifying that the timed bake cooking cycle
has started. When the desired stop time is reached,
the oven indicator light goes out and an alarm will
sound for approximately ten (10) seconds. The oven
will automatically shut off. "AUTO" will continue to
blink ON and OFF indicating that the clock timer was
set for an automatic timed function and is completed.
5. Turn the selector switch to "MANUAL", oven control
to the OFF position and press the "CANCEL/CLOCK"
button.


