


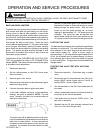

OPERATION AND SERVICE PROCEDURES
MECHANICAL TIMER FOR RSS MODELS
65 RC231002 Rev. 3
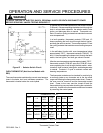
FIRE OR EXPOLSION HAZARD - LEAK TEST
COMPONENTS AFTER RECONNECTION
CLOCK TIMER (Non-Solid State)
The oven timer is an electric time-of-day clock, minute
minder, and an automatic switch which controls the opera-
tion of the bake portion of the oven and self-clean duration
of the oven.
Since the automatic switch is in series with the oven circuit,
many customers complaints on the operation of the oven
are due to a customers lack of knowledge of the operation
of the timer. The users manual gives complete information
of the use of the timer.
TIMER SWITCH
1. Set the selector switch for "TIMED COOK" and the
oven thermostat to 350°.
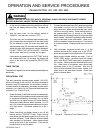
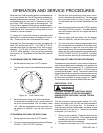
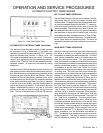
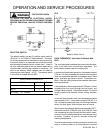
2. Set the time for automatic operation - Delayed Start
- by pushing in on the Start Timer Knob and set the
start time indicator about one hour ahead of the timer
on the clock. (See Figure 69.)
3. Push in on the Stop Time Knob and set the Stop Time
Indicator to approximately two (2) hours ahead of the
time on the clock. (See Figure 69.) This clock
assembly may use the analog or conventional clock
face and may be configured differently. However, all
test procedures are identical.
Figure 69
4. Advance the Clock Hands until they reach the Start
Time Setting; at this point the Start Time Knob should
"POP" out and within one (1) minute the oven burner
should go OFF.
5. Advance the Clock Hands until they reach the Stop
Time Setting; at this point the Stop Time Knob should
"POP" out and within one minute the oven burner
should go OFF.
6. If the oven burner does not turn "ON" and "OFF" after
conducting test in instructions one (1) through five (5)
then proceed as follows:
7. Be certain the wires are connected as shown in the
appropriate wiring diagram.
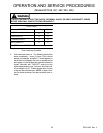
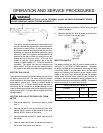
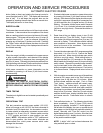
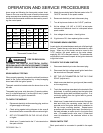
8. Conduct a continuity test across the switch contacts
of the clock timer. (See Figure 70.)
CLOCK TIMER
CONTACTS (DIAL)
Figure 70
CLOCK TIMER
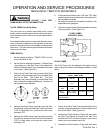
The Clock/Timer must be replaced if the switch will not
close or open the circuit at the settings indicated in Table
below.
CLOCK - TIMER CHART
CONDITIO SET UP 1 - 2 3 - 4
OFF BOTH KNOBS
OUT
OPEN OPEN
START
NOW
SET STOP
TIME
CLOSED CLOSED
DELAY
START
SET START &
STOP TIMES
*CLOSED *CLOSED
*CLOSED ONLY BETWEEN START TIME AND STOP
TIME SETTINGS.
1. Push in on the Stop Time Knob and set the Stop Time
Indicator to approximately two (2) hours ahead of the
time on the clock. (See Figure 69.)
2. Advance the Clock Hands or Digits until they reach
the Start Time Setting; at this point the Start Time
Knob should "POP" out and within one (1) minute the
lower oven burner should come ON.
3. Advance the Clock Hands or Digits until they reach