


OPERATION AND SERVICE PROCEDURES
(SLIDE IN MODELS)
25 RC231002 Rev. 3
DELAYED TIME BAKE
Oven starts at a later time and shuts off at the end of the
cooking cycle.
1. Turn selector switch knob to "AUTO".
2. Turn oven control knob to the desired baking tem-
perature.
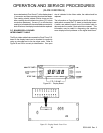
3. Press "COOK/CLEAN TIME" button. The display will
show "0:00".
4. Press the "UP" button to set the desired length of
baking time. EXAMPLE: To time bake for three (3)
hours press and hold the "UP" button until "3:00"
appears on the display, then release the UP button.
5. Press the "STOP TIME" button.
6. Press the "UP" button to set the desired stop time. To
have the time bake cycle finish at five o-clock (5:00),
press and hold the "UP" button until "5:00" appears on
the display, then release the "UP" button. After
approximately five (5) seconds, the display reverts
back to the Time-of-Day and "AUTO" appears on the
left of the display indicating that the Clock/Timer is
programmed for an automatic timed function. The
clock will automatically calculate the start time. When
the starting time is reached, the oven indicator in the
center of the display will come on indicating that the
timed bake cycle has started.
When the stop time is reached, the oven indicator
turns off and an alarm will sound for approximately
ten (10) seconds. The oven will automatically turn off
and AUTO will continue to blink ON and OFF indicat-
ing that the Clock/Timer was set for an automatic
timed mode and it is completed.
7. Turn the selector switch to "MANUAL", the oven
control to the OFF position, and press the "CANCEL/
CLOCK" button.
SETTING THE TIME FOR SELF-CLEAN
TO START SELF-CLEAN NOW:
1. Turn the Selector switch knob to the "AUTO" position.
2. Turn the oven control counterclockwise until it stops
("CLEAN - TURN TO STOP" position).
3. Move the latch lever to the right hand (self-clean)
position. The clean indicator will now come on.
4. Press the "COOK/CLEAN TIME" button. The display
will show "0:00".
5. Press the "UP" button to set the desired length of the
clean time. EXAMPLE: To self-clean the oven for
three (3) hours, press and hold the UP button until
"3:00" appears on the display, then release the "UP"
button.
After approximately five (5) seconds, the display
reverts back to the Time-of-Day and "AUTO" appears
on the left of the display along with the oven indicator
in the center of the display signifying that the clean
cycle has started.
The oven indicator light on the control panel will come
on and cycle ON and OFF with the thermostat.
6. At the end of the clean cycle the oven indicator light
and oven indicator (clock) will turn OFF, and an alarm
will sound for approximately ten (10) seconds. The
oven will automatically turn off and "AUTO" will
continue to blink ON and OFF indicating that the
Clock/Timer was set for an automatic timed mode
and it is now completed.
7. Turn the selector switch to "MANUAL", the oven
control to "OFF" and press the "CLOCK/CANCEL"
button.
8. The oven door can be opened approximately 30
minutes after the completion of the clean cycle. Do
not attempt to open the oven door latch until approxi-
mately thirty (30) minutes have elapsed, otherwise
the door lock mechanism may be damaged.
If the door will not open, wait five (5) minutes and try
again.
TO START SELF-CLEAN LATER:
1. Turn the selector switch knob to the "AUTO" position.
2. Turn the oven control counterclockwise until it stops
("CLEAN" - turn to "STOP" position).
3. Move the latch lever to the right hand ("SELF-CLEAN")
position. The clean indicator will now come on.
4. Press the "COOK/CLEAN" button.
5. Press the "UP" button to set the length of time desired
to self-clean the oven. For example, to self-clean up
to three (3) hours, press and hold the "UP" button until
"3:00" appears on the display, then release the "UP"
button.