


HotCup Operators’ Guide Initial Setup
November, 2007 17 6740001
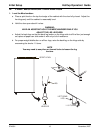
2. Mount the Base Plate:
WARNING
DO NOT MOVE THE CABINET WHILE HEX HEAD SCREWS AND/
OR CARRIAGE BOLTS ARE LOOSENED. THE CABINET WOULD
BECOME UNSTABLE AND LIKELY TO TIP AND CAUSE INJURY.
a. Remove the pail(s) from the inside of the merchandiser.
b. Remove the floor liner from the inside of the merchandiser.
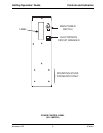
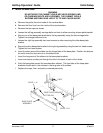
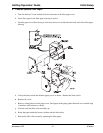
c. Remove the two caps as shown.
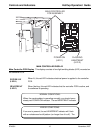
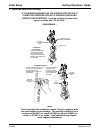
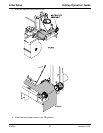
d. Loosen the left leg assembly carriage bolts and nuts to allow mounting a base plate bracket.
e. Secure one of the base plate brackets to the leg assembly using the two carriage bolts.
Tighten the carriage bolts and nuts.
f. Loosen the right leg assembly hex head screws to allow mounting the other base plate
bracket.
g. Secure the other base plate bracket to the right leg assembly using the two hex head screws.
Tighten the hex head screws.
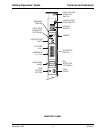
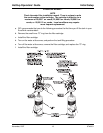
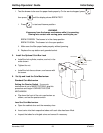
h. Insert the short arms of the slides into the hinged tabs of the base plate. Position the slide so
the notch near the short arm is on the bottom side.
i. Insert the long arms of the slides into the base plate brackets.
j. Insert and secure a cotter pin through the hole in the back of each of the slides.
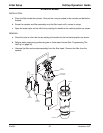
k. Push the base plate toward the merchandiser cabinet. The front tabs of the base plate
brackets should seat in the notches in the long arms of the slides.
l. Replace the caps, liner, and pail(s) removed previously.
CAPS
BASE PLATE BRACKET
COTTER PIN
B
ASE PLATE
ASSEMBLY
SLIDE - L.H.
SLIDE - R.H.