


HotCup Operators’ Guide Initial Setup
November, 2007 27 6740001
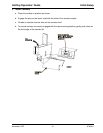
9. Load Cups:
CAUTION
Use only cups which have been designed for use in a hot
beverage vending machine.
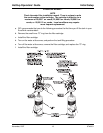
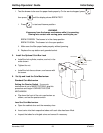
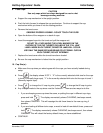
a. Support the cup mechanism in the upright position.
b. Push the latch forward to release the cup mechanism. Continue to support the cup
mechanism while you lower it into the loading position.
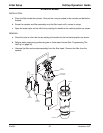
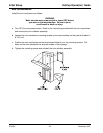
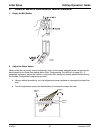
c. Remove the turret cover.
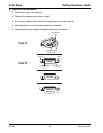
OBSERVE PROPER HYGIENE - DO NOT TOUCH THE CUPS!
d. Open the bottom of the wrapper on a stack of cups.
e. Insert the wrapped cups into the turret and pull the wrapper out.
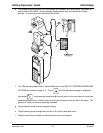
DO NOT FILL CUPS ABOVE THE LEVEL MARKED ON THE
OUTSIDE OF THE CUP TURRETS OR ABOVE THE “FILL LINE”
LABEL INSIDE EACH TURRET, OR MOTOR JAMS WILL OCCUR.
USE ONLY THE SAME SIZE AND BRAND OF HOT DRINK CUPS IN
EACH TURRET; DO NOT INTERMIX!
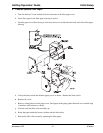
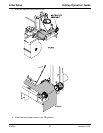
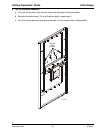
f. Replace the turret cover afrter the turrets have been loaded.
g. Be sure the cup mechanism is locked into the upright position.
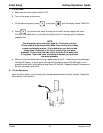
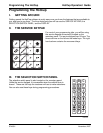
10. Cup Size(s):
a. Make sure the cup sizes you select agree with the cups you have actually loaded during
setup.
b. Press , the display shows X OZ Y. “X” is the currently selected drink size for the cups
in turret 2 (normally large cups), “Y” is the currently selected drink size for the cups in turret 1.
(Normally regular cups).
c. Press to change the #1 cup ring size; press to change the #2 cup ring size.
d. Any changes made to the cup sizes must be “locked in”. There are two ways to do this:
i. If you are keeping some cup sizes the same, or putting the cups in different cup rings,
press and hold . The display momentarily shows CLEARING, two beeps sound,
then shows FINISHED. This will reassign the old throw times to the new cup ring, if
possible.
ii. If you are loading all different size cups, or want to load all new default times, press and
hold . The display momentarily shows CLEARING, two beeps sound, then shows
FINISHED. This will reload the factory default times you have established.
e. CONTINUE.