


Page 9
Before You Begin
Before Using Your Range for the First Time
Remove all packaging materials and temporary labels from oven and cooktop.
1. Check that you have the items listed on Page 8.
2. Record the Model and Serial number on Page 45. See "Data Rating Plate."
These may be used for any future contacts with Customer Service. Enter this
information on the Product Registration Card included with this product then
mail it to the indicated address.
3. Optional Accessories. Grill Plate, Black Knob Kit, Chopping Board, Griddle
Cover, Wok Support Ring and other accessories are available from your Ther-
mador Dealer.
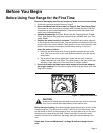
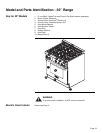
4. Position the racks correctly in the oven. The correct rack position depends
on the recipe and the cooking mode. The rack positions are numbered from the
bottom of the oven, like an elevator. Rack position 3 is the most frequently used
position. Place rack(s) in the proper position before turning on the oven.
Insert the racks as follows:
a. Hold the rack with the back rail in the up position towards the rear of the
oven. Slip it into the oven so the rack slides are between the rack and the
rack guides.
b. Tip the front of the rack up slightly as it slides into the oven so that the
safety stops clear the rack slides. The safety stops on the back of the rack
will keep it from sliding out of the oven when it is pulled forward.
5. Ensure that the burner caps are correctly seated on the burner bases of
the range's cooktop. Turn on each burner to check for proper flame color. See
Page 18 for details.
CAUTION
Aluminum foil should never be used to cover the oven racks or to line the
oven. Do not remove the broiler element in the electric oven.
Before baking or broiling, the oven and broiler should be turned on to burn off the
manufacturing oils. Turn the oven on to 450°F (230°C) for 20 to 30 minutes; then
turn the broiler to "Broil" for same length of time. You may wish to turn on the venti-
lator above your range during this time. Please note that it is normal for small
amounts of smoke to be visible from the range, during this initial breaking-in pro-
cess.
Please read “Care and Maintenance” on Page 38 before cleaning the oven
racks.
Figure 1: Oven Rack Positions
5
4
3
2
1