


19
ENGLISH
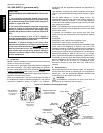
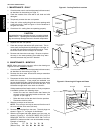
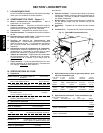
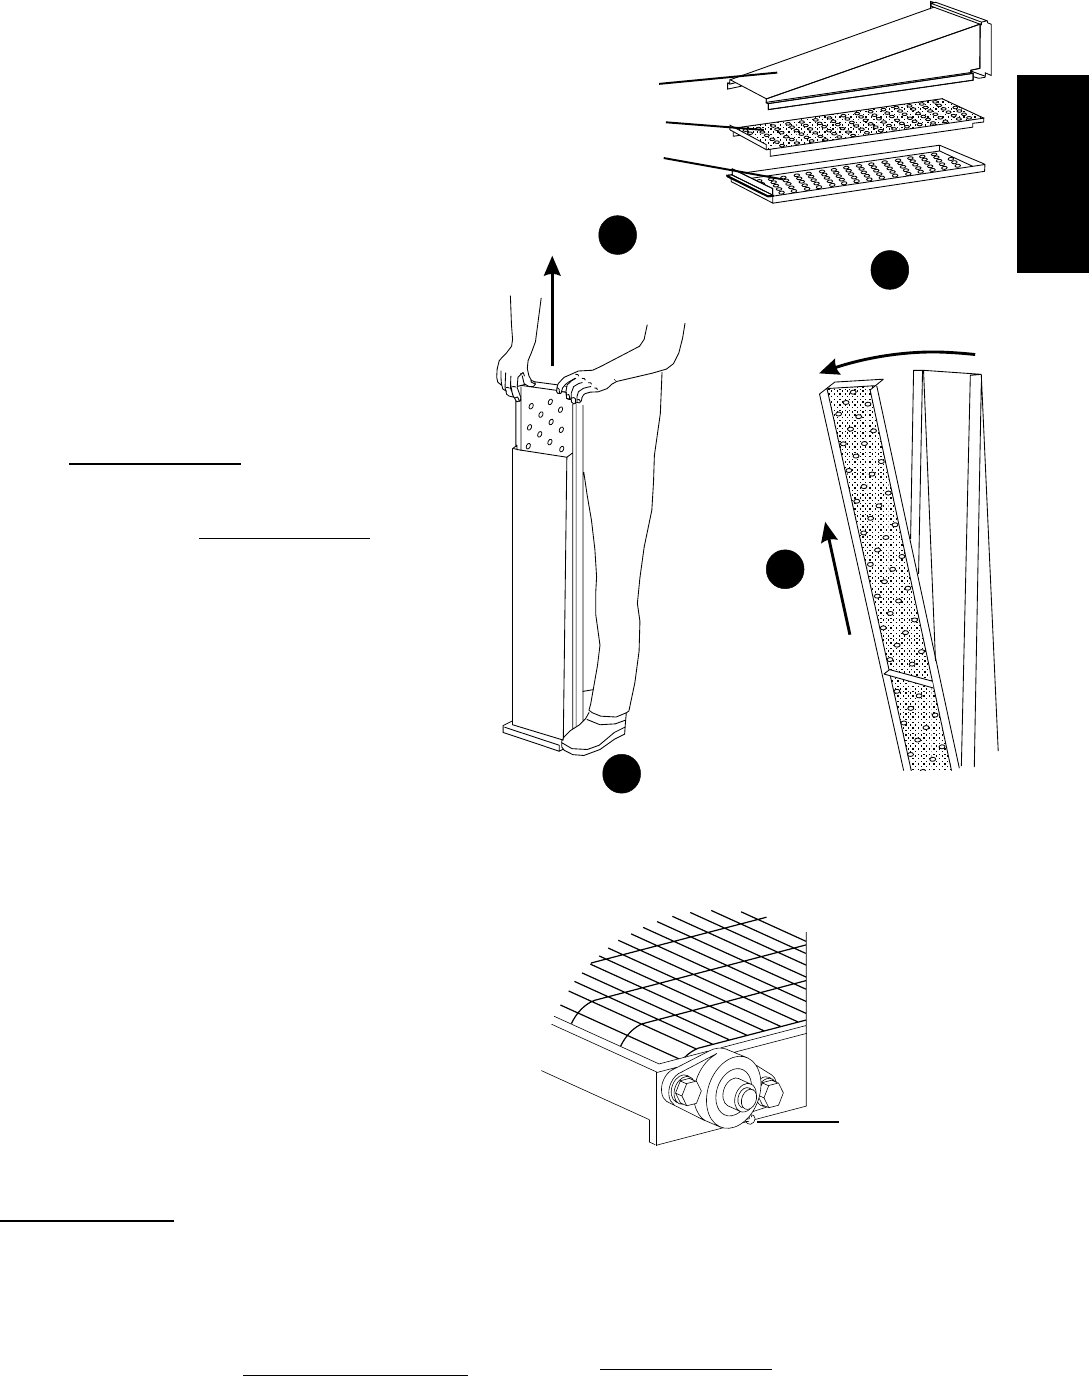
Figure 4-3 - Disassembling the Air Fingers
Pull outer plate
straight up
and off
Manifold
Inner plate
Outer Plate
2
Step on lip of manifold
1
Swing ends of inner plate and
manifold apart
3
Pull inner plate
upwards, and
then away from
manifold
4
SECTION 4 - MAINTENANCE
7. Disassemble the air fingers as shown in Figure 4-3. AS
EACH FINGER IS DISASSEMBLED, WRITE THE "LOCA-
TION CODE" FOR THE FINGER ON ALL THREE OF ITS
PIECES. This will help you in correctly reassembling the
air fingers.
CAUTION
Incorrect reassembly of the air fingers will change the
baking properties of the oven.
8. Clean the air finger components and the interior of the
baking chamber using a vacuum cleaner and a damp cloth.
Refer to the boxed warnings on Page 17 for cleaning
precautions.
9. Reassemble the air fingers. Then, replace them in the
oven, using the "location code" as a guide.
10. Replace the end plugs on the oven.
11. Reassemble the conveyor into the oven.
12. Reattach the drive chain. If the motor was repositioned to
allow the chain to be removed, adjust the tension of the
chain to the proper 1/2" (13mm) deflection. Refer to Step
3 of the Conveyor Installation instructions (on Page 9).
13. Check that the conveyor belt has the proper 2-3" (50-75mm)
deflection. If it is necessary to adjust the tension of the belt,
refer to Steps 4-6 of the
Conveyor Installation instructions
(on Page 9).
14. Replace the drive motor shroud and the conveyor extensions.
III. MAINTENANCE - EVERY 3 MONTHS
1. Check that the oven is cool and the power is disconnected,
as described in the warning on Page 17.
2. Vacuum both of the blower motors, and their surrounding
compartments, using a shop vacuum.
3. Tighten all electrical control terminal screws.
IV. MAINTENANCE - EVERY 6 MONTHS
1. Check that the oven is cool and the power is disconnected,
as described in the warning on Page 17.
2. Check for excessive wear on the conveyor drive motor
brushes. The brushes should be replaced if they have worn
to less than 1/4" (6.4mm) in length.
3. Clean and inspect the burner nozzle and electrode assembly.
4. Check (and clean, if necessary) the oven venting system,
including the flue.
5. Check the conveyor drive shaft bushings and spacers.
Replace the components if they are worn.
V. MAINTENANCE - EVERY 12 MONTHS
1. Remove the motor shroud and the drive-end conveyor
extension cover.
2. Disconnect the drive chain as described in Step 3 of the
Monthly Maintenance section (on Page 18).
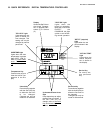
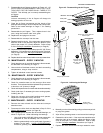
3. Use a grease gun to lubricate the drive shaft bearings, as
shown in Figure 4-4. When lubricating the bearings:
Use a high-quality NLGI #2, lithium soap grease with
petroleum oil, such as Middleby P/N 17110-0015.
Add the grease slowly until a small bead of grease is
present at the seals. AVOID OVERGREASING.
Excessive greasing may cause harm to the bearing.
4. Manually turn the drive shaft by pulling on the conveyor belt
to purge the grease.
5. Wipe off any excess grease on and around the bearings.
6. Reattach the drive chain. If the motor was repositioned to
allow the chain to be removed, adjust the tension of the
chain to the proper 1/2" (13mm) deflection. Refer to Step
3 of the Conveyor Installation instructions (on Page 9).
7. Replace the motor shroud and conveyor extension cover.
Figure 4-4 - Lubricating the Bearings
Grease fitting
(1 per bearing, 2 total)