7
7
OPERATING INSTRUCTIONS
1. Prepare recipe according to instructions. Place food in stoneware
liner and cover with the glass lid. Do not fill the stoneware liner to
the brim with food. Always cook with the lid on and the liner in posi-
tion. Remember that frequent lifting of the lid during cooking delays
cooking time. When cooking a meat and vegetable combination,
place the vegetables in the bottom of the liner first. Then add the
meat and other ingredients. If the liner is hot, DO NOT add cold
food and vice versa. The stoneware liner cannot stand the shock of
sudden temperature changes.
2. Plug into a 120 V ~ 60 Hz outlet.
3. Turn control knob to the desired cooking setting, high, low or auto.
CAUTION: COOKING BASE UNIT WILL GET VERY WARM DURING
COOKING. THIS IS WHERE THE HEATING ELEMENT IS LOCATED.
IF NECESSARY TO HANDLE, USE POT HOLDERS OR OVEN MITTS.
4. Cook according to recipe instructions.
5. When cooking time is complete, turn control knob to off position and
unplug from outlet.
6. Using oven mitts, carefully remove the glass lid by grasping the knob
and lifting the lid slightly away from you. This will allow the steam to
escape before removing the lid.
7. Allow a few seconds for all steam to escape. Then, using oven mitts,
remove the stoneware liner from the cooking base unit.
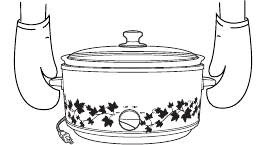
NOTE: If you are moving the Slow Cooker, grasp the unit by
the Base Unit Handles; use pot holders or oven mitts. (See
Figure 1.)
8. Even when switched OFF and
unplugged, the Slow Cooker remains
hot for some time after using; set aside
and allow unit to cool before cleaning
or storing.
9. Allow to cool completely before clean-
ing, see CARE AND CLEANING.
HINTS FOR SLOW COOKING
1. Meats will not brown during the cooking process. If you desire
browning, heat a small amount of oil in a skillet and brown meats
prior to putting into stoneware liner.
2. Whole herbs and spices flavor better in slow cooking than crushed
or ground.
MODE D’EMPLOI
1. Préparer les recettes en suivant les instructions. Placer les aliments
dans le récipient et mettre le couvercle. Ne pas remplir le récipient à
ras bord. La récipient et le couvercle doivent toujours rester en place
pendant la cuisson. Soulever trop fréquemment le couvercle pendant
la cuisson augmente le temps de cuisson. Si la recette comprend une
combinaison d’ingrédients, placer les légumes dans le fond, puis la
viande et les autres ingrédients. Si le récipient de céramique est
chaud, NE PAS y mettre d’ingrédients froids, car il ne résistera pas aux
changements brusques de température.
2. Brancher sur une prise de courant c.a. de 120 ~ 60 Hz.
3. Placer la commande à la position désirée (HIGH/LOW/AUTO).
MISE EN GARDE : LA BASE CHAUFFANTE DEVIENDRA TRÈS CHAUDE
DURANT LA CUISSON, CAR ELLE CONTIENT L’ÉLÉMENT
CHAUFFANT. SI NÉCESSAIRE, UTILISER DES POIGNÉES OU DES
MOUFLES ISOLANTES POUR MANIPULER L’APPAREIL.
4. Suivre les instructions de cuisson pour chaque recette.
5. Une fois la cuisson terminée, tourner la commande à OFF et
débrancher l’appareil.
6. Après avoir enfilé des moufles isolantes, retirer le couvercle de verre
en saisissant le bouton et en dirigeant le couvercle loin de soi afin de
laisser la vapeur s’échapper.
7. Retirer complètement le couvercle et laisser la vapeur s’échapper
encore quelques secondes. À l’aide des moufles isolantes, retirer le
récipient en céramique de la base chauffante.
NOTE : S’il faut déplacer la mijoteuse, mettre des poignées ou
des moufles isolantes et saisir les poignées de la base
chauffante (Figure 1).
8. Même si la commande est à OFF et
que le cordon est débranché, la
mijoteuse reste chaude un certain
temps après l’utilisation. La laisser
refroidir avant de la ranger.
9. La laisser refroidir complètement avant
de la nettoyer (voir NETTOYAGE).
CONSEILS DE CUISSON PAR MIJOTAGE
1. Les viandes ne brunissent pas durant la cuisson. Pour brunir, faire
chauffer une petite quantité d’huile dans une poêle et faire brunir la
viande avant de la déposer dans le récipient en céramique.
2. Les herbes et épices non moulues parfument davantage les plats
mijotés que les herbes et épices broyées.
Figure 1
Figure 1
WST3012ZE_IB_29-4-03_CrP4 4/29/03 1:50 PM Page 13


