


43
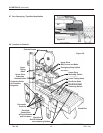
Maintenance (continued)
A
E
C
B
D
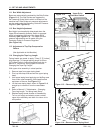
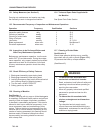
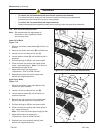
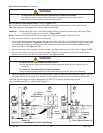
13.8 Box Drive Belt Replacement
Note – 3M recommends the replacement of
drive belts in pairs, especially if belts
are unevenly worn.
Lower Drive Belts
Figure 13-4
1. Remove and retain center plates (A) and four (4)
screws.
2. Remove and retain side cover (B) and fasteners.
3. Loosen, but do not remove lock nut (C).
4. Loosen tension screw (D) until all belt tension is
removed.
5. Pull belt splicing pin (E) out and remove belt.
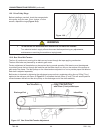
6. Place new belt over pulleys with laced splice
at top. Insert splicing pin. Note – Pin must not
extend beyond edge of belt.
7. Adjust belt tension as explained in
"Adjustments – Box Drive Belt Tension".
8. Replace side cover and center plates and
secure with original fasteners.
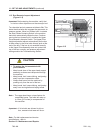
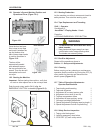
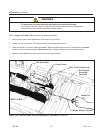
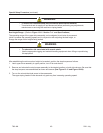
Upper Drive Belts
Figure 13-5
1. Remove and retain center plate (A) and four
screws and plain washers.
2. Loosen, but do not remove lock nut (B).
3. Loosen tension screw (C) until all tension is
removed from belt.
4. Remove four (4) screws on side of belt guard
(D) and slide belt guard out to expose belt.
5. Pull belt splicing pin (E) out and remove belt.
6. Place new belt over pulleys with laced splice at
top. Insert splicing pin.
Note – Pin must not extend beyond edge of belt.
7. Adjust belt tension as explained in
"Adjustments – Box Drive Belt Tension".
8. Replace front cover and belt guard(s) and
secure with original fasteners.
Figure 13-4 – Lower Drive Belt Replacement
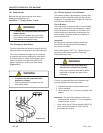
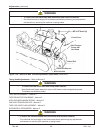
• To reduce the risk associated with mechanical and electrical hazards:
− Turn electrical and air supply off and disconnect before performing any adjustments,
maintenance or servicing the machine or taping heads
• To reduce the risk associated with impact hazards:
− Always use appropriate supporting means when working under the upper drive assembly
WARNING
Figure 13-5 – Upper Drive Belt Replacement
700r-NA
2011 July
A
B
C
E
D