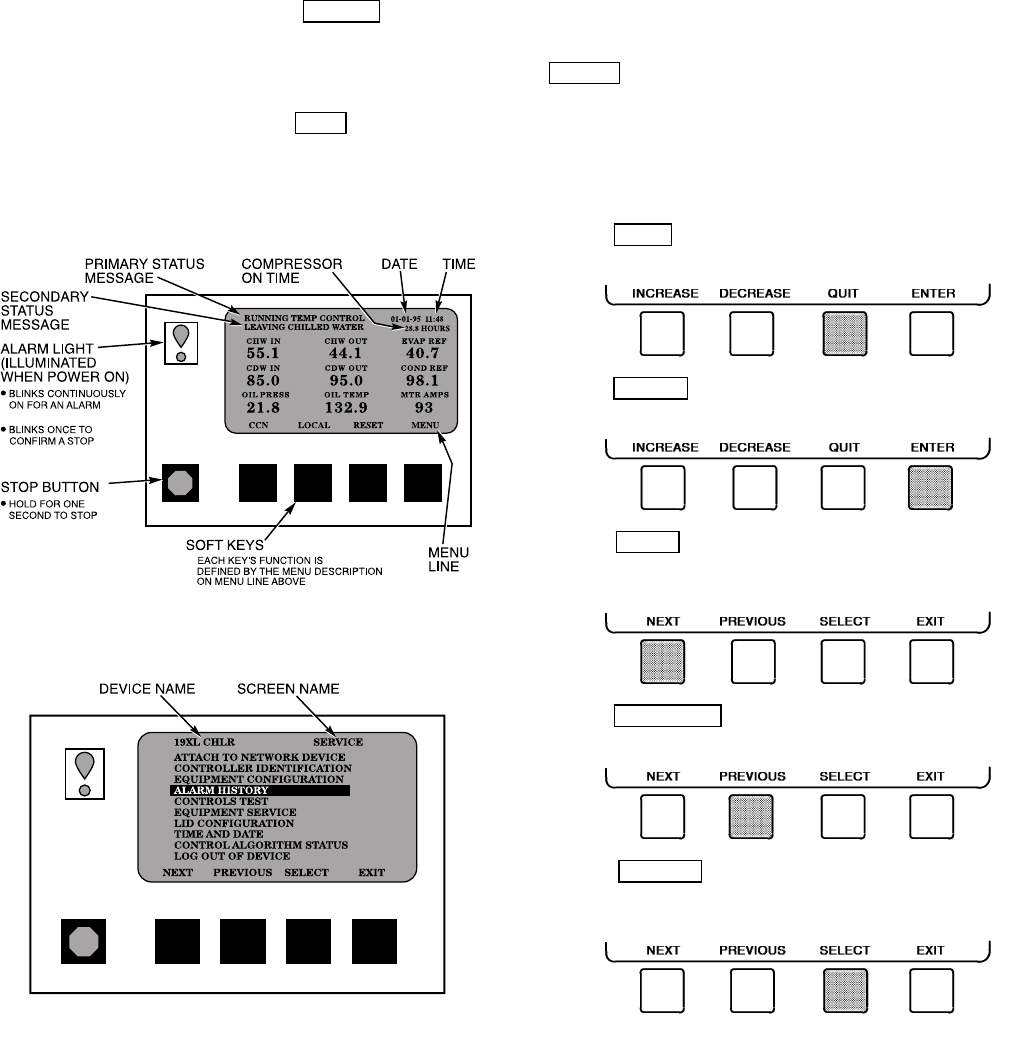
LID Operation and Menus (Fig. 13-19)
GENERAL
• The LID display will automatically revert to the default
screen after 15 minutes if no softkey activity takes place
and if the chiller is not in the Pumpdown mode
(Fig. 13).
• When not in the default screen, the upper right-hand cor-
ner of the LID always displays the name of the screen that
you have entered (Fig. 14).
• The LID may be configured in English or SI units, through
the LID configuration screen.
• Local Operation — By pressing the LOCAL
softkey, the
PIC is now in the LOCAL operation mode. The control
will accept changes to set points and configurations from
the LID only. The PIC will use the Local Time Schedule
to determine chiller start and stop times.
• CCN Operation — By pressing the CCN
softkey, the PIC
is now in the CCN operation mode, and the control will
accept modifications from any CCN interface or module
(with the proper authority), as well as the LID. The PIC
will use the CCN time schedule to determine start and stop
times.
ALARMS AND ALERTS — Alarm (*) and alert (!) status
are indicated on the Status tables.An alarm (*) will shut down
the compressor. An alert (!) notifies the operator that an un-
usual condition has occurred. The chiller will continue to
operate when an alert is shown.
Alarms are indicated when the control center alarm light
(!) flashes. The primary alarm message is viewed on the de-
fault screen and an additional, secondary, message and
troubleshooting information are sent to the Alarm History
table.
When an alarm is detected, the LID default screen will
freeze (stop updating) at the time of alarm. The freeze en-
ables the operator to view the chiller conditions at the time
of alarm. The Status tables will show the updated informa-
tion. Once all alarms have been cleared (by pressing the
RESET softkey), the default LID screen will return to nor-
mal operation.
MENU STRUCTURE — To perform any of the operations
described below, the PIC must be powered up and have suc-
cessfully completed its self test. The self test takes place
automatically, after power-up.
• Press QUIT
to leave the selected decision or field with-
out saving any changes.
• Press ENTER to leave the selected decision or field and
save changes.
• Press NEXT to scroll the cursor bar down in order to
highlight a point or to view more points below the current
screen.
• Press PREVIOUS to scroll the cursor bar up in order to
highlight a point or to view points above the current screen.
• Press SELECT to view the next screen level (high-
lighted with the cursor bar), or to override (if allowable)
the highlighted point value.
Fig. 13 — LID Default Screen
Fig. 14 — LID Service Screen
14
