Loosen the compressor holddown bolts to allow free spring
travel. Open the compressor suction and discharge service
valves. Check that oil is visible in the compressor sight glass.
Add oil if necessary.
See Pumpout and Refrigerant Transfer Procedures and
Optional Pumpout System Maintenance sections, pages 59
and 65, for details on transfer of refrigerant, oil specifica-
tions, etc.
High Altitude Locations — Recalibration of the pres-
sure transducers will be necessary as the chiller was initially
calibrated at sea level. Please see the calibration procedure
in the Troubleshooting Guide section.
Charge Refrigerant into Chiller
The transfer, addition, or removal of refrigerant in spring
isolated chillers may place severe stress on external pip-
ing if springs have not been blocked in both up and down
directions.
The standard 19XL chiller will have the refrigerant
already charged in the vessels. The 19XL may be ordered
with a nitrogen holding charge of 15 psig (103 kPa). Evacu-
ate the entire chiller, and charge chiller from refrigerant
cylinders.
19XL CHILLER EQUALIZATION WITHOUT PUMP-
OUT UNIT
When equalizing refrigerant pressure on the 19XL chiller
after service work or during the initial chiller start-up,
do not use the discharge isolation valve to equalize. The
motor cooling isolation valve or charging hose (con-
nected between pumpout valves on top of cooler and
condenser) is to be used as the equalization valve.
To equalize the pressure differential on a refrigerant
isolated 19XL chiller, use the TERMINATE LOCKOUT
function of the Control Test in the SERVICE menu. This
will help to turn on pumps and advise the proper procedure.
The following procedure describes how to equalize refrig-
erant pressure on an isolated 19XL chiller without a pump-
out unit:
1. Access TERMINATE LOCKOUT function on the Con-
trol Test.
2. Turn on the chilled water and condenser water pumps to
ensure against freezing.
3. Slowly open the refrigerant cooling isolation valve.
The chiller cooler and condenser pressures will grad-
ually equalize. This process will take approximately
15 minutes.
4. Once the pressures have equalized, the cooler isolation
valve, the condenser isolation valve, and the hot gas by-
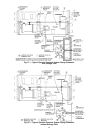
pass isolation valve may now be opened. Refer to Fig. 27
and 28, valves 11, 12, and 14.
Whenever turning the discharge isolation valve, be
sure to reattach the valve locking device. This will
prevent the valve from opening or closing during serv-
ice work or during chiller operation.
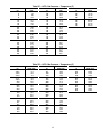
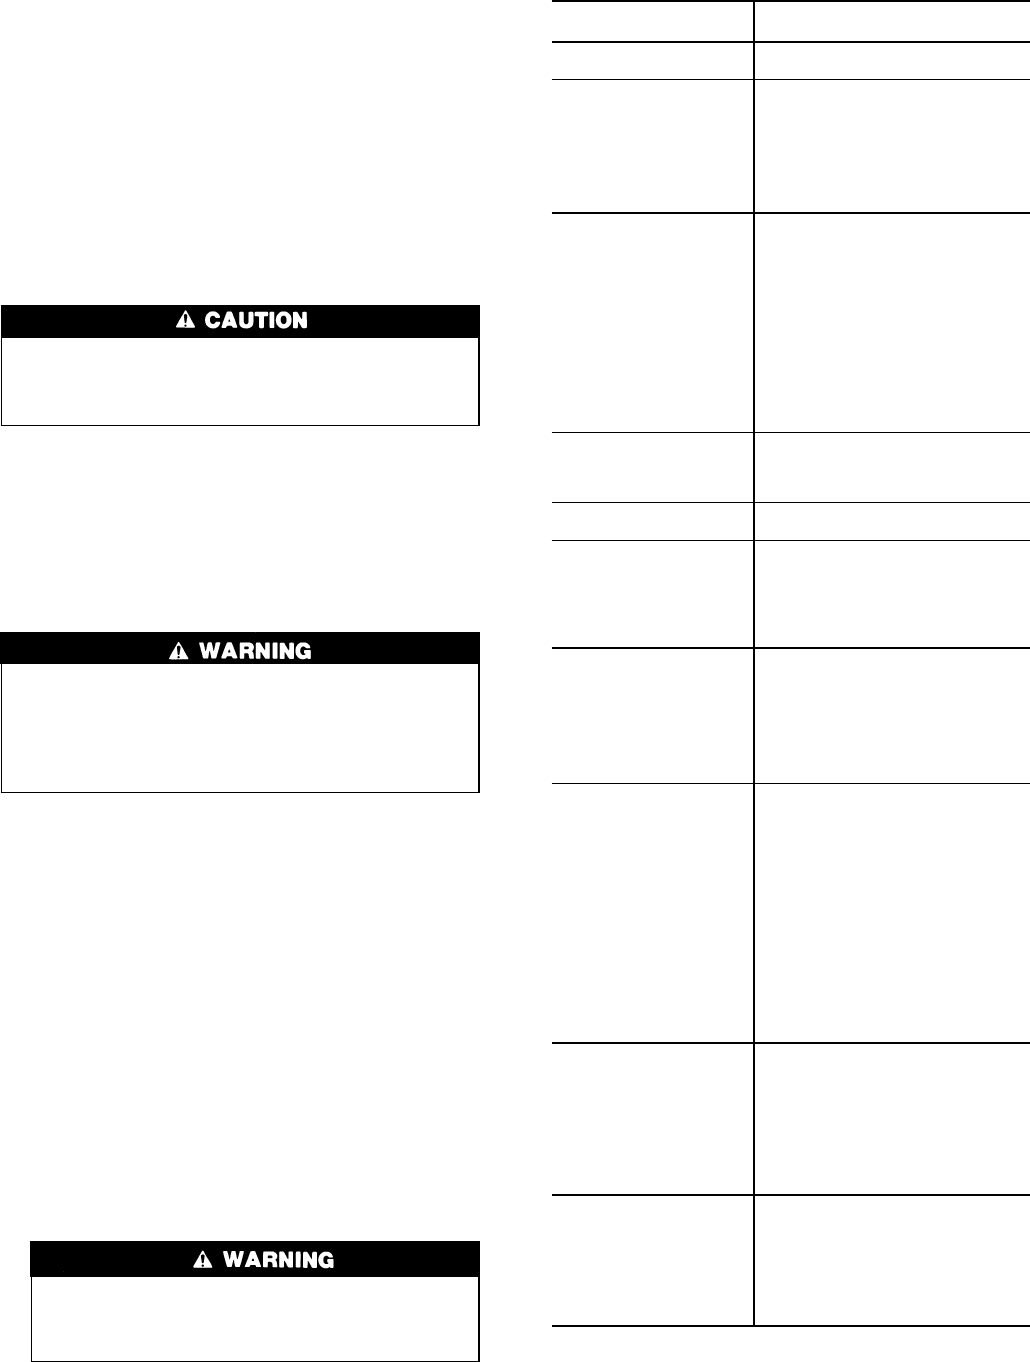
Table 7 — Control Test Menu Functions
TESTS TO BE
PERFORMED
DEVICES TESTED
1. Automated Tests* Operates the second through
seventh tests
2. PSIO Thermistors Entering chilled water
Leaving chilled water
Entering condenser water
Leaving condenser water
Discharge temperature
Bearing temperature
Motor winding temperature
Oil sump temperature
3. Options Thermistors Common chilled water supply
sensor
Common chilled water return sensor
Remote reset sensor
Temperature sensor — Spare 1
Spare 2
Spare 3
Spare 4
Spare 5
Spare 6
Spare 7
Spare 8
Spare 9
4. Transducers Evaporator pressure
Condenser pressure
Oil pressure differential
Oil pump pressure
5. Guide Vane Actuator Open
Close
6. Pumps All pumps or individual pumps may
be activated:
Oil pump — Confirm pressure
Chilled water pump — Confirm flow
Condenser water pump — Confirm
flow
7. Discrete Outputs All outputs or individual outputs may
be energized:
Hot gas bypass relay
Oil heater relay
Motor cooling relay
Tower fan relay
Alarm relay
Shunt trip relay
8. Pumpdown/Lockout When using pumpdown/lockout,
observe freeze up precautions when
removing charge:
Instructs operator as to which valves
to close and when
Starts chilled water and condenser
water pumps and confirms flows
Monitors — Evaporator pressure
Condenser pressure
Evaporator temperature
during pumpout
procedures
Turns pumps off after pumpdown
Locks out compressor
9. Terminate Lockout Starts pumps and monitors flows
Instructs operator as to which values
to open and when
Monitors — Evaporator pressure
Condenser pressure
Evaporator temperature
during charging process
Terminates compressor lockout
10. Refrigerant Type Sets refrigerant type used:
HCFC-22 or HFC-134a.
NOTE: Be sure to ATTACH TO
LOCAL DEVICE after changing
refrigerant type.
See Attach to Network Device
Control section, page 37.
*During anyof the teststhat are notautomated, anout-of-range read-
ing will have an asterisk (*) next to the reading and a message will
be displayed.
53


