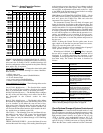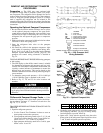
2. Observe that all 6-gate LEDs are lit on the starter SCR
control board.
3. The factory setting should bring the motor to full voltage
in 15 to 30 seconds. If the setting is not correct, adjust the
ramp potentiometer counterclockwise for a shorter time,
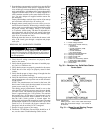
clockwise for a longer time. (See Fig. 5 for starter com-
ponent placement.)
Check Oil Pressure and Compressor Stop
1. When the motor is up to full speed, note the differential
oil pressure reading on the LID default screen. It should
be between 18 and 30 psid (124 to 206 kPad).
2. Press the Stop button and listen for any unusual sounds
from the compressor as it coasts to a stop.
Calibrate Motor Current
1. Make sure that the compressor motor rated load amps in
the Service1 table has been configured. Place an ammeter
on the line that passes through the motor load current trans-
fer on the motor side of the power factor correction ca-
pacitors (if provided).
2. Start the compressor and establish a steady motor current
value between 70% and 100% RLA by manually over-
riding the guide vane target value on the LID and setting
the chilled water set point to a low value. Do not exceed
105% of the nameplate RLA.
3. When a steady motor current value in the desired range
is met, compare the compressor motor amps value on the
Status01 table to the actual amps shown on the ammeter
on the starter. Adjust the amps value on the LID to
the actual value seen at the starter if there is a difference.
Highlight the amps value then press SELECT
.
Press INCREASE
or DECREASE to bring the value
to that indicated on the ammeter. Press ENTER
when
equal.
4. Make sure that the target guide vane position is released
into AUTOMATIC mode.
To PreventAccidental Start-Up — The PIC can be
set up so that start-up of the unit is more difficult than just
pressing the LOCAL
or CCN softkeys during chiller serv-
ice or when necessary. By accessing the Status01 table, and
highlighting the chiller Start/Stop line, the value can be over-
ridden to stop by pressing SELECT
and then the
STOP
and ENTER softkeys. ‘‘SUPVSR’’ will appear
after the value. When attempting to restart, remember to
release the override. The default chiller message line will
also state that the Start/Stop has been set to ‘‘Start’’or ‘‘Stop’’
when the value is overridden.
Check Chiller Operating Condition — Check to
be sure that chiller temperatures, pressures, water flows, and
oil and refrigerant levels indicate that the system is func-
tioning properly.
Instruct the Customer Operator — Check to be sure
that the operator(s) understand all operating and main-
tenance procedures. Point out the various chiller parts and
explain their function as part of the complete system.
COOLER-CONDENSER — Float chamber, relief devices,
refrigerant charging valve, temperature sensor locations, pres-
sure transducer locations, Schrader fittings, waterboxes and
tubes, and vents and drains.
OPTIONAL STORAGE TANK AND PUMPOUT SYS-
TEM — Transfer valves and pumpout system, refrigerant
charging and pumpdown procedure, and relief devices.
MOTOR COMPRESSOR ASSEMBLY — Guide vane
actuator, transmission, motor cooling system, oil cool-
ing system, temperature and pressure sensors, oil sight
glasses, integral oil pump, isolatable oil filter, extra oil and
motor temperature sensors, synthetic oil, and compressor
serviceability.
MOTOR COMPRESSOR LUBRICATION SYSTEM — Oil
pump, cooler filter, oil heater, oil charge and specification,
operating and shutdown oil level, temperature and pressure,
and oil charging connections.
CONTROL SYSTEM — CCN and Local start, reset, menu,
softkey functions, LID operation, occupancy schedule, set
points, safety controls, and auxiliary and optional controls.
AUXILIARY EQUIPMENT — Starters and disconnects, sepa-
rate electrical sources, pumps, and cooling tower.
DESCRIBE CHILLER CYCLES — Refrigerant, motor cool-
ing, lubrication, and oil reclaim.
REVIEW MAINTENANCE — Scheduled, routine, and ex-
tended shutdowns, importance of a log sheet, importance of
water treatment and tube cleaning, and importance of main-
taining a leak-free chiller.
SAFETY DEVICESAND PROCEDURES — Electrical dis-
connects, relief device inspection, and handling refrigerant.
CHECK OPERATOR KNOWLEDGE — Start, stop, and shut-
down procedures; safety and operating controls; refrigerant
and oil charging; and job safety.
REVIEW THE START-UP, OPERATION, AND MAINTE-
NANCE MANUAL
OPERATING INSTRUCTIONS
Operator Duties
1. Become familiar withrefrigeration chiller andrelated equip-
ment before operating the chiller.
2. Prepare the system for start-up, start and stop the chiller,
and place the system in a shutdown condition.
3. Maintain a log of operating conditions and document any
abnormal readings.
4. Inspect the equipment, make routine adjustments, and per-
form a Control Test. Maintain the proper oil and refrig-
erant levels.
5. Protect the system from damage during shutdown
periods.
6. Maintain the set point, time schedules, and other PIC
functions.
Prepare the Chiller for Start-Up — Follow the steps
described in the Initial Start-Up section, page 55.
To Start the Chiller
1. Start the water pumps, if they are not automatic.
2. On the LID default screen, press the LOCAL
or
CCN
softkey to start the system. If the chiller is in
the OCCUPIED mode, and the start timers have expired,
the start sequence will start. Follow the procedure de-
scribed in the Start-Up/Shutdown/Recycle section,
page 39.
Check the Running System — After the compres-
sor starts, the operator should monitor the LID display and
observe the parameters for normal operating conditions:
1. The oil reservoir temperature should be above 140 F
(60 C) during shutdown, and above 100 F (38 C) during
compressor operation.
56


