


20
USA
5958 931 01
After 5 seconds the COOKING TEMPERATURE stops flashing to
indicate that it has been SET.
Note
The temperature of the steam cycle is automatically set at
212°F(100°C). You can, however, set low temperature steam
from 77°F to 210°F(25° to 99°C) by turning the knob.
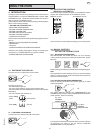
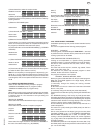
4.3.3 SETTING THE COOKING TIME
Press the following illuminated button (button lights up) to set
cooking time:
TM
The relative DISPLAY will show the TOTAL REMAINING TIME of
the cooking cycle (large numbers) and the TIME TO BE SET (small
numbers - flash for 5 seconds).
E.g. : 1 h 30'
TOTAL REMAINING
TIME
E.g..: 1 h 30'
CURRENT
REMAINING TIME
time LED on
Turn the knob clockwise (to increase the value) or counter clockwise
(to decrease the value) to set the desired cooking TIME on the small
DISPLAY.
After 5 seconds the COOKING TIME display stops flashing to
indicate that it has been SET.
Note:
In this case there is only one cooking cycle or phase so CURRENT
remaining time and TOTAL remaining time will coincide.
Note:
In the hot air cycle it is not possible to set a time longer than 10
minutes with a maximum temperature between 483°... 572°F
(251°...300°C).
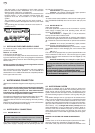
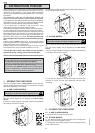
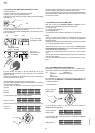
4.3.4 SETTING AND USING THE PROBE (TO MONITOR
PRODUCT CORE TEMPERATURE)
This temperature probe allows high precision control of the
temperature reached at the core of the product being cooked so that
the desired value can be set and the cooking cycle stopped
automatically when the product core reaches the set temperature.
Important
: The temperature probe is a precision
instrument and must be handled with care. Avoid knocks,
do not apply excessive force when inserting the probe, an
do not pull on the lead (take care particularly when using
roll-in racks). The guarantee does not cover damage to th
e
core temperature probe caused by improper use.
1) Switch on the oven and preheat if necessary.
2) Stop the cooking cycle.
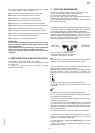
Remove the product core temperature probe "C" from its seat "D"
and insert it into the product without forcing it and making sure that
the tip (sensitive element) is located in the proximity of the centre of
the product.
MULTIPOINT probe with 6 sensors
The oven is equipped with a MULTIPOINT probe with 6 sensors
located at intervals along the wand, enabling the correct
temperature to be read in the centre of the product even if the
probe tip is not positioned at the product core.
Close the oven door.
3) Select the desired cooking cycle and set the cooking temperature
on thermostat TS.
Important: do not set the cooking time on Timer TM.
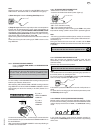
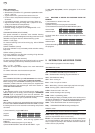
4) Set the TEMPERATURE of the CORE PROBE by pressing the
following illuminated button twice (button lights up):
PRB
The relative DISPLAY will show the PROBE TEMPERATURE
(large numbers) and the TEMPERATURE TO SET (small numbers
- flash for 5 seconds).
E.g.: 135°F
CURRENT PROBE
TEMPERATURE
E.g.: 176°F
REQUIRED
PROBE
TEMPERATURE
temperature probe
LED on
Turn the knob clockwise (to increase the value) or counter clockwise
(to decrease the value) to set the DESIRED PROBE
TEMPERATURE on the small DISPLAY.
After 5 seconds the DESIRED PROBE TEMPERATURE stops
flashing to indicate that it has been SET.