9
Instructions for Use
BEFORE USING FOR THE FIRST TIME
1. Before using the Programmable Pressure Cooker for the first time,
wash the Removable Cooking pot, the Self-Locking Lid and the
Rubber Gasket with warm soapy water. Rinse with clear water and dry
thoroughly.
2. Make sure the Rubber gasket is seated properly around the Lid. To
ensure correct fitting of the Rubber Gasket, fill the Removable Cooking
Pot 2/3 full with water and run on HIGH PRESSURE for 15 minutes.
Wait 15 minutes, then release pressure by pressing on the QUICK
STEAM RELEASE Button in short bursts. The Pressure Indicator Rod
will drop. Let the appliance cool to room temperature. Pour out the
water. Rinse and towel dry the Removable Cooking Pot. The Pressure
Cooker is now ready to be used.
BEFORE YOU BEGIN COOKING EACH TIME
For best results, always check that the Pressure Regulator knob, Pressure
Indicator, Steam Release Valve and Safety Valves are in good working
order and that there are no foreign particles
blocking the Valve openings on the underside
of the Lid. See Care and Cleaning Instructions.
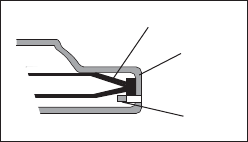
IMPORTANT: The Rubber Gasket must be
placed properly over the four hooks in the Lid
as shown.
POWER SURGE PROTECTION FEATURE
This Pressure Cooker has a Back-up Feature to prevent malfunction in the
event of power surges. If the Pressure Cooker is unplugged or switched
off, allow at least 30 seconds for the program to clear before turning the
unit back on.
NON-STICK SURFACE
Be sure to always use either plastic or wooden utensils so as not to
scratch the non-stick surface. Never use metal tongs, forks, or knives as
they can damage the coating on the Removable Cooking Pot.
Operating Instructions
1. Plug the cord into a grounded-type 120V AC electrical wall outlet.
2. Position the Removable Cooking Pot in the Housing so that its Rear
Centering Guide slides into the Slot for Centering Guide on the inside of
the Housing.
3. Choose the desired program by pressing either WARM, COOK MODE:
(BROWN or STEAM), or PRESSURE MODE: (HIGH or LOW).
Rubber Gasket
Lid
Hook
9
Précautions avant usage
AVANT LA PREMIÈRE UTILISATION
1. Avant d’utiliser votre autocuiseur pour la première fois, lavez le récipient
amovible, le couvercle et le joint en caoutchouc dans de l’eau chaude
savonneuse. Rincez à l’eau claire et séchez soigneusement.
2. Assurez-vous que le joint en caoutchouc est bien installé dans le
couvercle. Pour vérifier, remplissez d’eau le récipient amovible jusqu’au
2/3 et faites fonctionner l’appareil sur HAUTE PRESSION (HIGH) pendant
15 minutes. Attendez 15 minutes, puis éliminez la pression en appuyant
plusieurs fois brièvement sur le bouton de DÉCOMPRESSION RAPIDE.
Lorsque la tige-témoin de pression tombe, laissez refroidir l’appareil
jusqu’à la température de la pièce. Videz le récipient amovible, rincez-le
et essuyez-le avec un torchon. Votre autocuiseur est alors prêt à l’usage
AVANT CHAQUE UTILISATION
Pour plus de précautions, assurez-vous toujours du bon état du régulateur de
pression, de la tige-témoin de pression, de la soupape d’évacuation et des
soupapes de sûreté et vérifiez qu’aucun corps étranger n’obstrue l’orifice des
soupapes à l’intérieur du couvercle. Voir la section « Entretien ».
IMPORTANT : Le joint en caoutchouc doit être
correctement maintenu par les quatre crochets
à l’intérieur du couvercle, tel qu’illustré.
PROTECTION CONTRE LES
SURTENSIONS
Votre autocuiseur est muni d’un dispositif de protection du programme en cas
de sautes de tension. Si l’autocuiseur est débranché ou mis à l’arrêt, attendre
environ 30 secondes pour libérer la mémoire avant de le remettre en marche.
REVÊTEMENT ANTIADHÉSIF
Utilisez toujours des ustensiles en matière plastique ou en bois pour éviter
d’égratigner la surface antiadhésive. Ne vous servez jamais de pinces
métalliques, d’une fourchette ou d’un couteau pour ne pas endommager la
surface du récipient de l’autocuiseur.
Mode d’emploi
1. Branchez le cordon électrique dans une prise murale de 120V c.a. avec
mise à la terre.
2. Installez le récipient amovible dans le boîtier en faisant coulisser le guide
de centrage arrière dans la glissière de centrage située à l’intérieur du
boîtier.
3. Sélectionnez le programme désiré en appuyant sur WARM, COOK MODE
(BROWN ou STEAM) ou PRESSURE MODE (HIGH ou LOW).
Joint en caoutchouc
Couvercle
Crochet
RHNPC800PIB_10-5-02 10/5/02 12:13 Page 17


