75
4
4
7. Place new bowl gasket on carburetor body
and install fuel bowl. Place new fiber
washer on fixed main jet (bowl nut) and
install. Torque to values listed in Section
12 - Engine Specifications.
Install Carburetor
NOTE: Always replace air cleaner gaskets and
carburetor mounting gaskets any time the
carburetor has been removed for service.
1. Hook z-bend of governor link into
grommet on top of the throttle shaft lever.
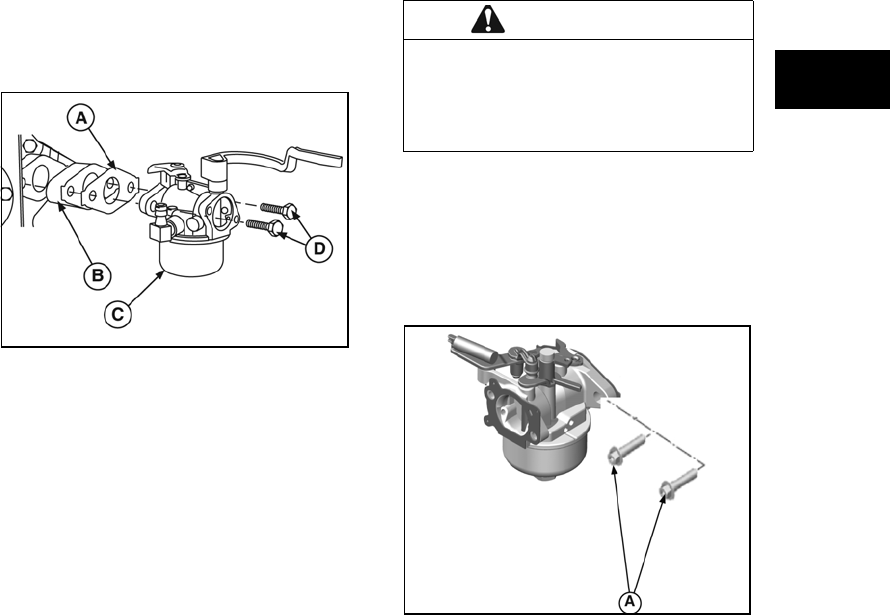
2. Place new gasket (A, Figure 34) between
adapter (B) and carburetor (C).
3. Position carburetor on control bracket and
install screws or nuts (D). Torque to value
listed in Section 12 - Engine
Specifications.
Figure 34
NOTE: Use new screws or apply Loctite® to
original screws to prevent loosening from
vibration.
4. Connect fuel hose to carburetor and
secure with clamp. Connect primer hose, if
equipped.
5. Using new gasket, install air cleaner
assembly to carburetor per Section 1.
Ensure breather hose is properly installed
on the breather tube.
NOTE: For snow engines, install the 1 or 2 piece
shroud.
6. Adjust carburetor, if applicable, per
Section 1.
ReadyStart® Carburetor
Vertical Model 120000
This carburetor utilizes a thermostatically
controlled choke system, requiring no primer or
manual choking when starting. The linkages
installed in the carburetor are not individually
serviceable, requiring replacement with a
complete carburetor assembly.
Remove Carburetor
1. Remove air cleaner assembly per Section
1. Discard the gasket.
2. Move clamp and disconnect fuel hose
from carburetor.
3. Remove two carburetor mounting screws
(A, Figure 35).
Figure 35
4. Carefully remove carburetor from control
bracket. Rotate the carburetor to
disconnect the choke link, spring, and
governor link.
WARNING
Before servicing the carburetor or other fuel
system components, drain all fuel from the
tank and turn OFF the fuel valve (if equipped).
Do not attempt to stop the fuel flow by plugging
the fuel hose.


