


Viper Service Manual
© 2010, IMI Cornelius Inc. - 23 - Publication Number: 621360041TBSER
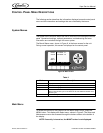
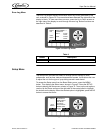
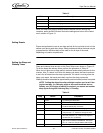
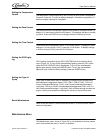
When the sleep and wakeup settings and the defrost lockout settings are
complete, press the BACK button to save the settings and return to the Select
menu, shown in Figure 13.
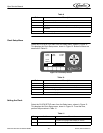
Setting Events
Events setup allows the user to set sleep periods for the unit and to lock out the
defrost cycle during peak busy times. Sleep periods and defrost lockouts may be
programmed for individual days of the week or for all days of the week,
depending on location requirements.
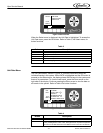
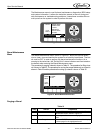
Setting the Sleep and
Wakeup Times
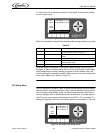
Sleep and wakeup times are set on the Event Setup menu shown in Figure 16.
To set the sleep and wakeup times, perform the procedure in Table 16.
When the unit goes into a sleep period, the barrel automatically defrosts for four
minutes. Also, if a barrel is off when the sleep cycle starts, the barrel continues
to be in the off state when the sleep cycle ends. If a barrel is running when the
sleep cycle starts, the barrel starts back up when the sleep cycle ends.
Wakeup should be scheduled for approximately one hour before product is required.
NOTE: Setting the sleep time after midnight requires you to set it dur-
ing the next day. (i.e. Saturday night at 1am must be set as 1am on
Sunday, etc.) If this type of setting is required, you cannot set another
sleep cycle during that following day, i.e. Sunday.
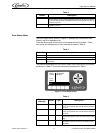
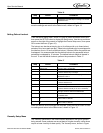
Table 15
Button Description
BACK Returns the display to the Select menu and saves current settings
CLEAR Clears the highlighted field on the menu
- Decrements the highlighted field
+ Increments the highlighted field
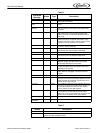
Table 16
Step Action Procedure
1
Set sleep and wakeup
times
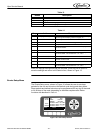
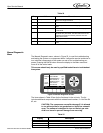
Open the Events Setup menu, shown in Figure 16
by pressing the GO button.
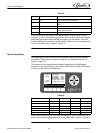
2
Select DAY The DAY field is highlighted.
3
Set DAY Use the + or - buttons at the bottom of the display
to set the desired day or all days.
4
Select SLEEP Use the up and down arrows to highlight SLEEP.
5
Set hour field Use the left and right arrows to select the hour field
and press the + or - buttons to change the hour.
6
Set minute field Use the left and right arrows to select the minute
field and press the + or - buttons to change the
minutes (15 min. increments)
7
Select AM/PM field If the 12 hour clock option is selected, use the left and
right arrows to select the AM/PM field. Then press
the + or - buttons to change between AM and PM.
8
Select DAY for Wakeup Repeat Steps 2 and 3 as needed.