


Viper Service Manual
© 2010, IMI Cornelius Inc. - 61 - Publication Number: 621360041TBSER
DISPLAY BOARD REPLACEMENT
When replacing or testing electronic components, be sure to wear a static strap
that is connected to a chassis ground. This protects the electronic components
from any static charge while working on the unit.
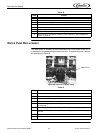
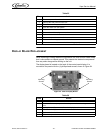
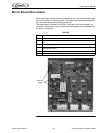
The display board is located on the back of the control panel display. It is
mounted to the panel with four (4) phillips head screws, shown in Figure 54.
Figure 54. View of Display Board
Table 55
Step Action
1 Disconnect power from the unit.
2 Remove the side panel from the unit.
3 Turn off the water supply to the unit.
4 Drain the water from the system.
5 Disconnect the wires from the switch.
6 Remove the switch, using two wrenches.
7 Replace the switch with a new unit.
8 Reverse the procedure to install the new switch.
9 Restore the water supply and check for leaks.
10 Check to ensure that the new switch is working properly.
Table 56
Step Action
1 Disconnect power from the unit.
2 Connect a static strap to your wrist and any convenient chassis ground on the
unit.
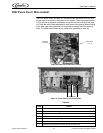
3 Unplug the two (2) connectors from the display board.
4 Remove the four (4) screws from the corners of the board.
5 Replace the board with a new board.
6 Reverse the procedure to install the new board.
Mounting
Screws
Mounting
Screws