


FORM 160.55-O1 (604)
151
YORK INTERNATIONAL
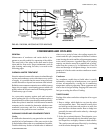
TUBE CLEAN ING PRO CE DURES
Brush Cleaning of Tube
If the tube foul ing con sists of dirt and sludge, it can
usu al ly be re moved by means of the brushing process.
Drain the water sides of the circuit to be cleaned (cool ing
wa ter or chilled water) remove the heads and thor ough ly
clean each tube with a soft bristle bronze brush. DO
NOT USE A STEEL BRISTLE BRUSH. A steel brush
may damage the tubes.
Improved results can be ob tained by admitting water into
the tube during the clean ing process. This can be done
by mounting the brush on a suitable length of 1/8" pipe
with a few small holes at the brush end and con nect ing
the other end by means of a hose to the water supply.
The tubes should always be brush cleaned be fore acid
cleaning.
Acid Cleaning of Tubes
If the tubes are fouled with a hard scale deposit, they
must be acid cleaned. It is im por tant that before acid
cleaning, the tubes be cleaned by the brush ing pro cess
described above. If the rel a tive ly loose for eign ma te ri al
is re moved before the acid cleaning, the acid so lu tion
will have less ma te ri al to dis solve and ß ush from the
tubes with the result that a more satisfactory clean ing job
will be ac com plished with a probable sav ing of time.
COMMERCIAL ACID CLEANING
In many major cities, com mer cial organizations now
of fer a spe cial ized ser vice of acid cleaning coolers
and condensers. If acid cleaning is required, YORK
rec om mends the use of this type of or ga ni za tion. The
Dow Industries Service Division of the Dow Chem i cal
Com pa ny, Tul sa, Okla ho ma, with branch es in prin ci pal
cit ies is one of the most reliable of these companies.
TESTING FOR COOL ER AND CON DENS ER TUBE
LEAKS
Cooler and con dens er tube leaks may result in re frig er ant
leaking into the water cir cuit, or water leak ing into the
shell de pend ing on the pressure levels. If re frig er ant is
leaking into the water it can be detected at the liquid head
vents after a period of shutdown. If wa ter is leak ing into
the refrigerant, fre quent purging will be nec es sary and
sys tem capacity and efÞ ciency will drop off sharply. If
a tube is leaking and water has en tered the system, the
cooler and con dens er should be valved off from the rest
of the water circuit and drained im me di ate ly to prevent
severe rust ing and corrosion. If a tube leak is indicated,
the exact location of the leak may be determined as
follows:
1. Allow the system to warm up until a substantial
pres sure is reached for testing. Dry nitrogen (pres-
sure not to exceed 12 PSIG) may be ad mit ted to the
unit to in crease pressure in the shell. Re move the
heads and lis ten at each section of tubes for a hiss-
ing sound that would indicate gas leakage. This will
as sist in locating the section of tubes to be further
in ves ti gat ed. If the prob a ble location of the leaky
tubes has been de ter mined, treat that section in the
fol low ing manner (if the lo ca tion is not deÞ nite, all
the tubes will require in ves ti ga tion).
2. Wash off both tube heads and the ends of all tubes
with wa ter.
Do not use car bon tet ra chlo ride for
this pur pose since its fumes give the
same fl ame dis col or a tion that the re-
frig er ant does.
3. With nitrogen or dry air blow out the tubes to clear
them of traces of re frig er ant laden mois ture from the
cir cu la tion wa ter. As soon as the tubes are clear, a cork
should be driven into each end of the tube. Re peat this
with all of the other tubes in the sus pect ed section or if
nec es sary, with all the tubes in the cool er or con dens er.
Allow the cooler or conden ser to re main corked up to
12 to 24 hours before pro ceed ing. De pend ing upon
the amount of leak age, the corks may blow from the
end of a tube, in di cat ing the lo ca tion of the leakage.
If not, it will be nec es sary to make a very thorough
test with the ha lide torch.
4. After the tubes have been corked for 12 to 24 hours,
it is recommended that two men working at both
ends of the cooler care ful ly test each tube - one man
re mov ing corks at one end and the oth er at the op-
po site end to remove corks and handle the test torch.
Start with the top row of tubes in the section being
in ves ti gat ed, remove the corks at the ends of one
tube si mul ta neous ly and insert the ex plor ing tube
for 5 sec onds - this should be long enough to draw
into the de tec tor any refrigerant gas that might have
leaked through the tube walls. A fan placed at the end
of the cooler op po site the torch will assure that any
leakage will travel through the tube to the torch.
5. Mark any leak ing tubes for later identiÞ cation.
6. If any of the tube sheet joints are leaking, the leak
should be de tect ed by the test torch. If a tube sheet
leak is suspected, its exact lo ca tion may be found
by using a soap solution. A con tin u ous buildup of
bub bles around a tube indicates a tube sheet leak.
8