


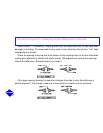
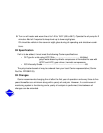

Assembled Couplings
If there is room on the shaft between coupling and component to clamp a sturdy bracket, the
arrangement illustrated in Figure 43 may be used. The clamps must have room to rotate with
the shaft.
This method is quicker because the couplings do not have to be disassembled. In addition,
eccentricity or coupling face runout are not problems since both shafts rotate together.
When using brackets, the diameter in the alignment formula (see Near Final Alignment,
Connecting Angular Misalignment section) will be that of the circle through which the dial
indicator rotates.
1. Shut down the machine.
2. With machine at operating temperature, quickly install brackets.
3. Check that alignment is within .002 TIR and .00033 per in. of traverse across the diameter
of measurement. Adjust alignment as required. (Refer to Near Final Alignment section.)
4. Remove brackets and run machine until operating temperature is again reached.
5. Recheck the alignment per steps 1 through 4 until it remains within the specified tolerances.
Be sure that coupling guards are replaced after these checks.
Click here for Figure 43 —Alignment Check —Assembled Coupling