


3-7
T -309
e. “END” is displayed to indicate the end of the alarm
list if any alarms are active.
f. “CLEAr” is displayed if all alarms are inactive. The
alarm queue may than be cleared by pressing the EN-
TER key. The alarm list will clear and “
-- -- -- -- --”
will be displayed.
3.5. UNIT PRE-TRIP DIAGNOSTICS
Pre--Trip Diagnostics i s an independent controller
function which will suspend normal refrigeration
controller activities and provide preprogrammed test
routines. The test routines include Auto Mode testing,
which automatically preforms a pre programmed
sequenced of tests, or Manual Mode testing, which
allows the operator to select and run any of the
individual t ests.
CAUTION
Pre-trip inspection should not be performed
with critical temperature cargoes in the con-
tainer.
CAUTION
When Pre-Trip key is pre ssed, economy, de-
humidification and bulb mode will be deac-
tivated. At the completion of Pre-Trip activi-
ty, economy, dehumidification and bulb
mode must be reactivated.
Testing may be initiated by use of the Key Pad or via
communication, but when initiated by communication
the controller will execute the entire battery of tests
(auto mode).
At the end of a pre-trip test, the message “P,” “rSLts”
(pretest results) will be displayed. Pressing the ENTER
key will allow the user to see the results for all subtests.
The results will be displayed as “PASS” or “FAIL” for
all t he tests run to completion.
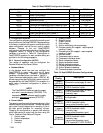
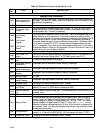
A detailed description of the pre-trip tests and test codes
is provided in Table 3-7. detailed operating instructions
are provided in paragraph 4.7.
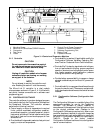
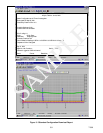
3.6 DataCORDER
3.6.1 Description
The Carrier T ransicold “DataCORDER,” software is
integrated into the controllerand serves to eliminate the
temperature recorder and paper chart. The
DataCORDER functions may be accessed by key pad
selections andviewedon the displaymodule. The unitis
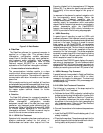
also fitted with interrogation connections (see
Figure 3- 1) which may be used with the C arrier
Transicold Data Reader to down load data. A personal
computer with Carrier Transicold Data View software
may also be used to download data and configure
settings. The DataCORDER consists of:
Configuration Software
Operational Software
Data Storage Memory
Real Time Clock (with internal battery backup)
Six thermistor inputs
Interrogation Connections
Power supply (battery pack).
The DataCORDER performs the following functions:
a. Logs data at 15, 30, 60 or 120 minute i ntervals and
stores two years’ of data (based on onehour interval).
b. Records and displays alarms on the display module.
c. Records results of pre--trip testing.
d. Records DataCORDER and temperature controlsoft-
ware generated data and events as follows:
Container ID Change
Software Upgrades
Alarm Activity
Battery Low (Battery Pack)
Data Retrieval
Defrost Start and End
Dehumidification Start and End
Power Loss (w/wo battery pack)
Power Up (w/wo battery pack)
Remote Probe Temperatures in the Container
(USDA Cold treatment and Cargo probe recording)
Return Air Tem perature
Set Point Change
Supply Air Temperature
Real Time Clock Battery (Internal Battery) Replace-
ment
Real Time Clock Modification
Trip Start
ISO Trip Header (When entered via Interrogation
program)
Economy Mode Start and End
“Auto 2” Pre-Trip Start and End
Bulb Mode Start
Bulb Mode changes
Bulb Mode End
USDA Trip Comment
Humidification Start and End
USDA Probe Calibration
3.6.2 DataCORDER Software
The DataCORDER Software is subdivided into the
Configuration Software, Operational Software and the
Data Memory.
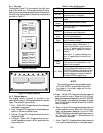
a. Operational Software
The Operational Software reads and interprets inputs
for use by the Configuration Software. The inputs are
labeled Function Codes. There are 35 functions (see
Ta ble 3-8) which the operator may access to examine
the current input data or stored data. To access these
codes, do the following:
1 Press the ALT. MODE & CODE SELECT keys.
2 Press an arrow key until the left window displays the
desired code number. The right window will display
the value of this item for five seconds before return-
ing to the normal display mode.
3 If a longer time is desired, press the ENTER key to
extend the time to 30 seconds.