33
326142000
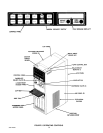
1. Press ‘‘OFF 1’’ and ‘‘OFF 2’’ switches on Unit control panel to stop refrigeration system and beaters
motors.
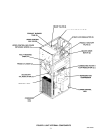
2. Remove condenser coil access panel as instructed.
3. Clean condenser coil with vacuum cleaner, low pressure compressed air, or a soft brush.
4. Install condenser coil access panel by reversing removal procedure.
5. Press ‘‘AUTO 1’’ and ‘‘AUTO 2’’ switches on Unit control panel to start refrigeration system and beaters
motors.
ADJUSTMENTS
ADJUSTING PLAIN WATER PRESSURE REGULATOR
(see Figures 2 and 12)
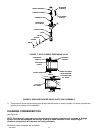
Carbonator plain water inlet adjustable water pressure regulator is factory adjusted to 45-psi and should not be
readjusted.
ADJUSTING CARBONATED WATER FLOW RATE
The back carbonated water flow regulators (see Figures 2 and 6), which control carbonated water flow rate into
product blender tanks, are factory adjusted for flow rate of 1.5 ± 0.05 ounces per second and normally do not
require adjustment. However, if adjustment is necessary, proceed as follows:
1. Press applicable ‘‘OFF 1’’ or ‘‘OFF 2’’ switch to prevent more product from entering applicable product
blender tank.
2. Disconnect Unit syrup inlet line from applicable soft drink tank.
3. Remove applicable side panel from Unit as instructed for access to applicable carbonated water flow
regulator, product shutoff valve, and product sample valve.
4. Close applicable product shutoff valve to prevent more product from entering freeze cylinder.
5. Place container under applicable product sample valve. Open valve and allow all product to be purged from
product blender tank, then close valve.
6. Remove lower front access panel as instructed for access to secondary CO
2
regulators.
7. Note pressure setting on secondary CO
2
regulator with 60-psi gage for product blender tanks. Turn
regulator adjusting screw out (counterclockwise) until gage reads 0-psi. Pull up on applicable product
blender tank relief valve to release CO
2
pressure from tank.
8. Disconnect carbonated water line from outlet side of applicable carbonated water flow regulator.
9. Connect line, long enough to reach to outside of Unit, to water flow regulator outlet, then route line to
outside of Unit.
10. Place end of carbonated water line, routed to outside of Unit, in container.
11. Press applicable ‘‘AUTO BLEND 1’’ or ‘‘AUTO BLEND 2’’ switch to activate electrically operated
carbonated water solenoid.
12. When steady stream of water is flowing from added length of line, catch carbonated water in container
graduated in ounces for exactly 10-seconds. Press applicable ‘‘FILL 1’’ or ‘‘FILL 2’’ switch to deactivate
carbonated water solenoid. In 10-seconds, 14 to 16-ounces of water should have been dispensed.
13. If adjustment is necessary, loosen jam nut on carbonated water flow regulator. Turn regulator adjusting
screw to the left (counterclockwise) to reduce carbonated water flow rate or turn screw to the right
(clockwise) to increase flow rate. Tighten jam nut and tap on regulator to register adjustment.


