


51 326142000
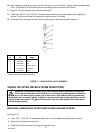
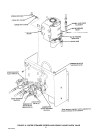
2. Slowly loosen CO
2
regulator assembly coupling nut allowing CO
2
pressure to escape, then remove
regulator assembly from empty CO
2
cylinder.
3. Unfasten safety chain and remove empty CO
2
cylinder.
4. Position full CO
2
cylinder and secure with safety chain.
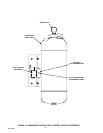
WARNING: To avoid personal injury and/or property damage, always secure CO
2
cylinder in
upright position with safety chain to prevent it from falling over. Should valve become
accidentally damaged or broken off, CO
2
cylinder can cause serious personal injury.
5. Make sure gasket is in place inside CO
2
regulator coupling nut, then install regulator on CO
2
cylinder.
6. Open (counterclockwise) CO
2
cylinder valve slightly to allow lines to slowly fill with gas, the open valve fully
to back-seat valve. (Back-seating valve prevents leakage around valve shaft).
7. Check CO
2
connections for leaks. Tighten loose connections.
SYRUP FLAVOR CHANGE
One or both syrup flavors can be changed at the same time. Perform flavor change on one system as follows:
1. Perform sanitizing procedure on syrup system syrup flavor change will be made on as instructed in
SERVICE AND MAINTENANCE SECTION.
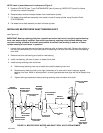
IMPORTANT: The following CO
2
and liquid disconnects disconnecting and connecting procedure for
soft drink tank replacement or filling soft drink tank in place must be performed in order as follows:
To disconnect soft drink tank from Unit syrup system.
A. Disconnect liquid disconnect from soft drink tank. NOTE - Disconnecting liquid disconnect
from soft drink tank first prevents syrup from backflowing through Unit syrup flow regulator
which may alter regulator adjustment.
B. Second, disconnect CO
2
quick disconnect from soft drink tank.
To connect soft drink tank into Unit syrup system.
C. First, connect CO
2
quick disconnect to soft drink tank to pressurize tank.
D. Second, connect liquid quick disconnect to soft drink tank.
2. First, pressurize soft drink tank containing new flavor syrup by connecting CO
2
line to tank, then connect
Unit syrup inlet line to tank.
3. Press applicable ‘‘FILL 1’’ or ‘‘FILL 2’’ switch to fill applicable No. 1 or No. 2 syrup system syrup float switch
with syrup.
4. Press applicable ‘‘AUTO BLEND 1’’ or ‘‘AUTO BLEND 2’’ switch to fill applicable No. 1 or No. 2 system
product blender tank with product.
5. Press applicable ‘‘AUTO 1’’ or ‘‘AUTO 2’’ switch to start refrigeration system and beater in applicable No. 1
or No. 2 freeze cylinder.
CAUTION: Do not relieve freeze cylinder pressure too fast or product will foam excessively
in freeze cylinder and lose carbonation.
6. After carbonator water pump cycles off, intermittently pull and release applicable No. 1 or No. 2 freeze
cylinder faceplate relief valve. This bleeds CO
2
from freeze cylinder and allows product to enter and fill
cylinder.
7. If necessary, adjust BRIX, product viscosity (product consistency), and product carbonation of dispensed
product as instructed.