


34326142000
14. Repeat steps 11 through 13 until desired carbonated water flow rate is achieved.
15. Remove added length of line from outlet side of carbonated water flow regulator. Connect carbonated
water line, disconnected from carbonated water flow regulator in step 8 preceding, to regulator outlet.
16. Turn product blender tanks CO
2
regulator, with 60-psi gage, adjusting screw in (clockwise) until gage
registers pressure noted in step 7 preceding.
17. Pull relief valve on applicable product blender tank to purge air from tank, then close valve.
18. Connect Unit syrup inlet line to soft drink tank.
19. Press applicable ‘‘AUTO BLEND 1’’ or ‘‘AUTO BLEND 2’’ switch to fill product blender tank with product.
20. Open product shutoff valve that was closed in step 4 preceding.
21. Install side panel and lower front access panel by reversing removal procedure.
ADJUSTING CO
2
REGULATORS
NOTE: To readjust CO
2
regulator to a lower setting, loosen adjusting screw lock nut, then turn screw to
the left (counterclockwise) until pressure gage reads 5-psi lower than new setting will be. Turn
adjusting screw to the right (clockwise) until gage registers new setting, then tighten lock nut.
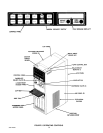
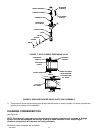
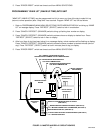
Primary CO
2
Regulator.
(see Figure 2)
Adjust primary CO
2
regulator by turning regulator adjusting screw to the right (clockwise) until regulator
pressure reads 80 to 100-psig.
Product Blender Tanks Secondary CO
2
Regulators.
(see Figures 2 and 6)
1. Remove Unit lower front access panel as instructed for access to product blender tanks secondary CO
2
regulators.
2. Adjust product blender tanks secondary CO
2
regulators, with 60-psi gages, by turning regulator adjusting
screws to the right (clockwise) until gages reads 30-psig.
3. Install lower front access panel by reversing removal procedure.
Carbonator Secondary CO
2
Regulator.
(see Figures 2 and 6)
1. Remove Unit lower front access panel as instructed for access to carbonator secondary CO
2
regulator.
2. Adjust carbonator secondary CO
2
regulator, with 100-psi gage, by turning regulator adjusting screw to the
right (clockwise) until gage reads 60-psig.
3. Install lower front access panel by reversing removal procedure.
IMPORTANT: Carbonator tank secondary CO
2
regulator must be adjusted 25-psi higher or more above
product blender tanks secondary CO
2
regulators pressure settings. Carbonated water and syrup
pressures must be able to overcome and vent product blender tanks head pressures while tanks are
filling with carbonated water and syrup. Carbonator tank secondary CO
2
regulator not adjusted high
enough will cause decreased flow of carbonated water into blender tanks which will increase brix of
dispensed product.