


Model 500/600
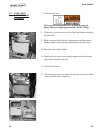
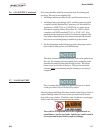
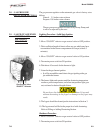
14. Prepare deadweight valve assembly for operation.
A metal shipping support is installed inside the dead-
weight valveassembly and must be removed prior to
installation and startup,or unit will NOT build pressure.
15. Unscrew the deadweight cap.
16. Remove the deadweight.
17. Remove and discard the shipping support.
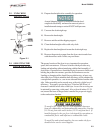
18. Clean the deadweight orifice with a dry cloth.
19. Replace the deadweight and secure the deadweight cap.
20. Remove the protective paper from the fryer exterior and clean
with the surfaces with a cloth, soap and water.
2-2. UNPACKING
INSTRUCTIONS
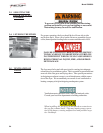
The proper location of the fryer is very important for operation,
speed, and convenience. Choose a location which provides easy
loading and unloading without interfering with the final assembly of
food orders. Operators have found that frying from raw to finish, and
holding the product in warmers, provides fast continuous service.
Landing or dumping tables should be provided next to, at least, one
side of the fryer. Keep in mind the best efficiency will be obtained by
a straight line operation, i.e., raw in one side and finished out the other
side. Order assembly can be moved away with only a slight loss of
efficiency. To properly service the fryer, 24 inches (60.96 cm) of
clearance is needed on all sides of the fryer. Access for servicing can
be attained by removing a side panel. Also, at least 6 inches (15.24
cm) around the base of the gas units is needed for proper air supply
to the combustion chamber.
To avoid a fire, install the fryer with minimum clearance
from all combustible and noncombustible materials, 6 inches
(15.24 cm) from side and 6 inches (15.24 cm) from back. If
installed properly, the gas fryer is designed for operation on
combustible floors and adjacent to combustible walls.
To avoid fire and ruined supplies, the area under the fryer
should not be used to store supplies.
2-3. SELECTING THE
FRYER LOCATION
710 2-3
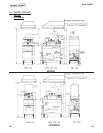
Figure 2-1
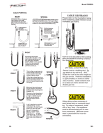
ORIFICE