


FIRE OR EXPLOSION - TO AVOID THE RISK OF ELECTRICAL SHOCK, PERSONAL
INJURY, OR DEATH, DISCONNECT POWER TO THE OVEN BEFORE SERVICING.
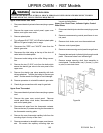
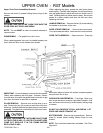
DISASSEMBLY PROCEDURES - RST MODELS
99 RC231002 Rev. 3
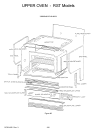
STORAGE DRAWER PANEL LINER (RST MODELS)
1. Remove storage drawer from range.
2. Remove six (6) screws securing drawer panel to liner.
3. Remove seven (7) screws securing liner to drawer
assembly.
4. Reverse procedure to reinstall.
DRAWER ASSEMBLY (RST MODELS)
1. Remove storage drawer from range.
2. Remove seven (7) screws securing drawer liner to
drawer assembly.
3. To replace the drawer assembly, remove the rivets
(two (2) each side) securing drawer runners to drawer
assembly.
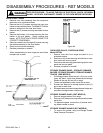
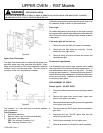
DRAWER RUNNER (RST MODELS)
1. Remove storage drawer from range.
2. Remove two (2) rivets securing drawer runner to
drawer assembly. NOTE: The drawer runner
"CATCH" and the drawer track "TAB" are color
coded. Be sure to match a black drawer runner
"CATCH" to a black drawer track "TAB" and gray
drawer runner "CATCH" to a gray drawer track "TAB".
SIDE PANEL TRIM
1. Shut off power to the range.
2. Remove oven door and storage drawer.
3. Remove grates, burner bowls, and main top.
4. Remove control panel.
5. Carefully pry trim off of side panel. Reverse proce-
dure to reinstall.
DILUTION FLUE
1. Shut off power to the range. Shut off main gas supply
and disconnect supply line from range. Slide range
away from wall.
2. Remove rear cover and main top.
3. Remove four (4) screws securing backguard to sup-
ports. Protect surface of burner box and carefully lay
backguard on burner box.
4. Remove two (2) screws securing dilution flue to
insulation retainer. Lift up and tilt flue forward to
remove. Check gas connections for leaks with soap
solution.
INNER FLUE
1. Follow Steps 1 - 4, Dilution Flue Removal.
2. Remove screws securing inner flue to combustion
chamber.
3. Reverse procedure to reinstall. Check gas connec-
tion for leaks with soap solution.
BROIL BURNER CHAMBER
1. Shut off power to the range. Shut off main gas supply
to range and disconnect main gas line to range. Slide
range away from wall.
2. Follow Steps 2 - 4, Dilution Flue Removal.
3. Remove screws securing inner flue to broil burner
chamber.
4. Remove oven door.
5. Remove broil ignitor and broil burner.
6. Remove four (4) screws in back oven wall and ten (10)
screws securing combustion chamber to oven liner.
7. Remove screws securing cup duct (broil burner feed
tube and orifice) to combustion chamber.
8. Slide chamber and chamber channels out of range.
When reassembling, be sure oven back gasket and
channels are in place. Check main gas connection for
leaks with leak detector or soapy water.
LOW BACK RAIL, BACK RAIL END CAPS, FLUE
COVER TRIM, DILUTION FLUE COVER
Models RST307, RST308, RST309
1. Shut off power to the range. Shut off main gas supply
and disconnect supply line from range. Pull range
away from wall.
2. Remove screws securing end caps to support brack-
ets.
3. Remove two (2) screws securing each end cap to low
back rail.
4. Remove two (2) screws securing flue cover trim to
flue cover.
5. Remove rivets securing flue cover to back rail.
6. Reverse procedure to reinstall. Check main gas
connection for leaks with leak detector or soapy
solution.