


FIRE OR EXPLOSION - TO AVOID THE RISK OF ELECTRICAL SHOCK, PERSONAL
INJURY, OR DEATH, DISCONNECT POWER TO THE OVEN BEFORE SERVICING.
DISASSEMBLY PROCEDURES - RST MODELS
97 RC231002 Rev. 3
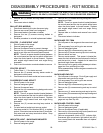
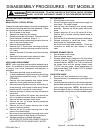
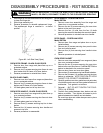
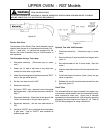
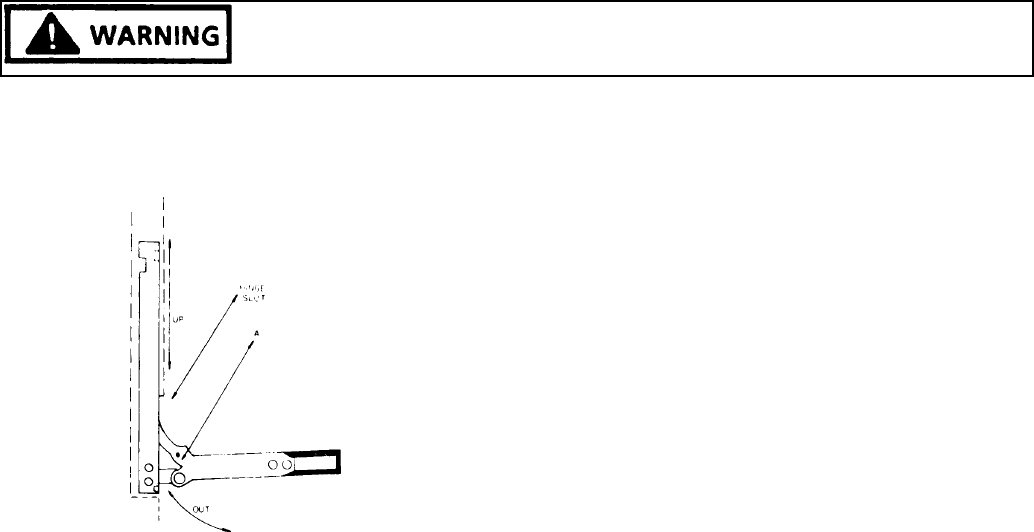
4. Slide hinge up into the frame and then out being sure
to clear the hinge slot.
5. Slide hinge assembly out.
6. Reverse procedure to reinstall replacement hinge.
The replacement hinge is received in a closed
position.
Figure 88 - Left Side View (Open)
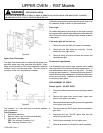
OVEN DOOR FRAME - BLACK GLASS DOOR
1. Remove door from range and place face up on a
protected surface.
2. Remove six (6) screws securing door frame to oven
door backer and lift frame off of door backer.
3. Reverse procedures to reinstall door frame.
BLACK GLASS PANEL
1. Remove oven door frame from range and place face
up on a protected surface.
2. Remove six (6) screws securing door frame to door
backer and lift frame off of door backer.
3. Lift black glass panel out of top door trim.
OVEN DOOR HANDLE - BLACK GLASS DOOR
1. Remove oven door from range and lay door face up
on a protected surface.
2. Remove six (6) screws securing door frame to door
backer.
3. Lift black glass panel out of top trim.
4. Remove three (3) screws securing top trim to door
backer.
5. Remove four (4) screws securing door handle and
spacers to top trim.
6. Reverse procedure to reassemble.
DOOR HANDLE - PORCELAIN DOOR
Model RST354
1. Remove oven door assembly from the range and
place door on a protected surface.
2. Remove the six (6) screws securing the oven door
backer to the oven door panel.
3. Remove the four (4) nuts from the four (4) bolts
securing the oven door handle to the oven door panel.
4. Reverse procedure to reinstall oven door handle.
DOOR PANEL - PORCELAIN DOOR
Model RST354
1. Remove door from range and place door on a pro-
tected surface.
2. Remove six (6) screws securing door panel to door
liner and remove panel.
3. Remove four (4) nuts securing door handle to door
panel.
4. Reverse procedure to reinstall panel.
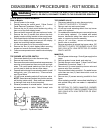
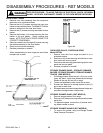
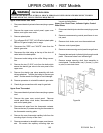
OVEN DOOR GASKET
1. Remove oven door assembly from range and place
door on a protected surface.
2. Remove the six (6) screws securing the oven door
backer to the oven door frame. On Model RST354 the
backer is attached to the outer door panel.
3. Remove door frame and oven door glass.
4. Remove two (2) screws securing heat shield to backer.
5. Remove the fourteen (14) screws securing the door
backer to subbacker. NOTE POSITION OF DOOR
GASKET FOR CORRECT REASSEMBLY.
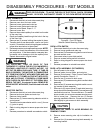
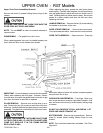
6. Carefully position new door gasket around perimeter
of sub backer and cross over door gasket at bottom of
sub backer. Tuck gasket in at corners.
7. Reinstall - BUT DO NOT TIGHTEN THE FOUR-
TEEN (14) SCREWS.
8. Position door gasket between door backer and sub
backer as shown. Then tighten all screws to pinch
gasket between door backer and sub backer.
Be sure hinge pins and rubber bumpers are in place
when reassembling.