


INSTALLATION INSTRUCTIONS
RC231002 Rev. 3 18
CHECKOUT PROCEDURE OF CLEAN CYCLE
OPERATION - RSS (WITH MECHANICAL TIMER;
FOR OTHER MODELS FOLLOW TIMER
INSTRUCTIONS)
REMOVE OVEN RACKS, BROILER PAN AND GRID.
A. Set the range clock to the correct time of day. (If not
set properly).
B. Push the turn the start dial on the backguard to the
approximate time of day until set stem pops out.
C. To establish length of clean time, turn the stop dial 1
1/2 hours to 2 hours ahead of start time. On electronic
clock models push clean button on timer for 3-hour
clean time.
D. Close and latch oven door, moving the latch arm to
the far right. (clean position).
E. Turn the oven heat control, on control panel, clock-
wise to "CLEAN" position. Then, turn selector switch
to the "CLEAN" setting.
F. A 15-20 second delay should occur, and the oven
indicator light should then come on.
G. After the cycle begins, the oven should reach a
temperature in excess of normal broiling (approxi-
mately 700°). The "CLEAN" indicator light should
come on, and the terminal lock system should lock
and secure the oven door.
H. Turn selector switch from "CLEAN" to "OFF" and heat
control to "OFF".
I. When oven temperature has lowered to approxi-
mately 700° or less, the lock system should unlock the
oven door allowing the latch handle to move freely.
DEFECTS
Any defects or faulty or damaged parts must be reported
immediately and steps taken to correct them through
normal dealer service channels.
POWER FAILURE
In the event of a power failure, safe manual lighting of the
top burners is possible. To do this, hold a lighted match at
the desired burner head (the part projecting above the
main top), turn the top burner control knob to the light
position.
The flame height can now be adjusted to the desired size.
The broil and oven burners cannot be operated during a
power failure and no attempt should be made to do so.
MAINTENANCE INSTRUCTIONS
1. Keep appliance clear and free from combustible
materials, gasoline, cleaning fluids, and other flam-
mable vapors and liquids.
2. Gas burners need sufficient air to operate. Objects
should not be placed in front of or on maintop rear of
range while in use. This could obstruct the air flow
needed for combustion and vent for flue products.
BURNER CLEANING -
The burner heads are made of aluminum and should not be
subjected to scouring or abrasive pads. Never not be
subjected to scouring or abrasive pads. Never use steel
wool or oven cleaners on the burner heads or they will dull
and not regain their original luster.
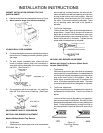
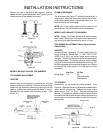
To clean the burners, remove the burner grates and push
the main top towards the rear of the range until the front
tabs are free. Then raise the main top and remove or
engage the main top support. This will support the main top
while the burners are removed for cleaning.
Before attempting to remove the burners, be certain the
four (4) burner mounting screws which retain the burners to
the burner supports are removed. If the screws are still
secured, they can be removed with a Phillips screwdriver.
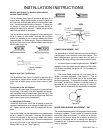
To remove the burners, release the burner head brackets
from the burner support, lift up and pull towards the rear of
the range.
To replace the burners slip the Venturi (long, thin end) over
the burner orifice and then position the burner locating
brackets into the burner support channel. Reinstall the
burner mounting screws.
Wiping the burners following each use will remove spillover
deposits and grease spatters before these soils get a
chance to harden on the surface. Burnt soil can be cleaned
by soaking the burners in warm water and a dishwashing
liquid detergent such as "Dove" or "Lux". A dishcloth or
nonabrasive pad (such as Dobie pad) should be used to rub
the burner caps after the soaking period. Be sure the
burners are dry, as water lodged in the burner parts might
cause an uneven flame or interfere with automatic lighting.
If stains still remain after soaking, you can soak any heavily
soiled burners in a solution of two tablespoons of "Dip-it"
per quart of water. Use a large pan and enough water so
the cap and base part of the burner assembly can be
completely immersed; bring water to a boil, remove vessel
from burner, and add measured amount of "Dip-it". Im-
merse the burner in the hot solution and soak for 20