


FIRE OR EXPLOSION - TO AVOID THE RISK OF ELECTRICAL SHOCK, PERSONAL
INJURY, OR DEATH, DISCONNECT POWER TO THE OVEN BEFORE SERVICING.
DISASSEMBLY PROCEDURES - RST MODELS
RC231002 Rev. 3 86
OVEN BOTTOM
1. Grasp both sides of the oven bottom at the front.
2. Lift up front and pull forward to free mounting tabs in
rear.
3. Lift up oven bottom and pull out.
4. Reverse procedure to reinstall oven bottom.
NOTE: Be sure rear tabs are properly positioned
when reinstalling oven bottom. An improperly placed
oven bottom will effect baking results.
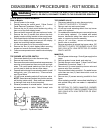
OVEN LAMP
1. Disconnect electricity at main disconnect plug.
2. Unscrew (counterclockwise) knurled glass dome from
light socket assembly. Remove light bulb.
USE GLOVE WHEN REMOVING AND INSTALLING
LAMP.
3. Reverse procedure to reinstall oven lamp.
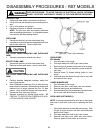
SOCKET-OVEN LAMP
1. Disconnect electricity at main disconnect plug.
2. Remove knurled glass dome - remove oven bulb.
USE GLOVE WHEN REMOVING AND INSTALLING
LAMP.
3. Carefully displace fiberglass insulation away from
rear of lamp socket.
4. With a flashlight to locate the four (4) tabs securing
lamp socket to oven liner. While pushing lamp socket
towards front of range, depress the four (4) tabs
inward. Lamp socket will release into oven cavity.
5. Disconnect wires from lamp socket.
6. Reverse procedure to reinstall lamp socket. BE
CERTAIN TO REPOSITION FIBERGLASS INSU-
LATION AROUND LAMP SOCKET.
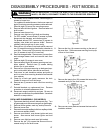
Figure 80 - Oven Light Assembly
OVEN PROBE
ERC Models
1. Shut off power to the range.
2. Pull range away from wall to gain rear access.
3. Remove eight (8) screws holding rear cover to range.
4. Disconnect two (2) wire harness to probe at discon-
nect plug.
5. Remove three (3) screws holding probe to oven
cavity.
6. Pull probe and wire leads through hole in oven wall
and remove from range.
LOWER BURNER BOX
1. Shut off power to the range.
2. Remove oven door, oven racks, and oven bottom.
3. Remove bake ignitor and bake burner.
4. Remove twenty-four (24) screws securing lower burner
box to oven tank and insulation retainer.
OVEN LINER (RST MODELS)
NOTE: It is recommended that the oven be run through at
least one (1) self-clean cycle prior to replacing the oven
liner.
1. Disconnect electricity at main disconnect plug. Shut
off gas at supply line shut off valve and disconnect
gas line from range.
2. Pull range away from wall to gain rear access.
3. Remove oven door, oven racks, and oven bottom.
Remove grates, burner bowls, and main top.