


91
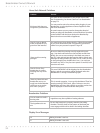
Care and Maintenance
CAUTION! Risk of personal injury. The Beyond Breadmaker does not container any user-
serviceable components. Do not disassemble the Breadmaker for any reason. Refer all repair
and service needs to qualified personnel. If your Breadmaker is not functioning properly,
please contact:
Toastmaster Inc.
National Service Center
708 South Missouri St.
Macon, MO 63552
In USA and Canada call:
Consumer Service: 1-800-947-3744
Consumer Parts: 1-800-947-3745
consumer_relations@toastmaster.com
Cleaning Precautions
To avoid electrical shock, personal injury or damage to the Beyond Breadmaker, observe the
following precautions when cleaning the Breadmaker:
• Caution: To avoid electric shock, unplug the Breadmaker before cleaning!
• Do not use vinegar, bleach, or harsh chemicals to clean the Breadmaker.
• To avoid damage to the non-stick surfaces on the baking pan and kneading pad-
dle, do not use metal scouring pads or other metallic objects when cleaning these
components
• To avoid damage to the drive shaft, do not allow water to soak inside the bread
pan for long periods of time.
• The baking chamber contains the heating element and drive shaft. When cleaning,
NEVER pour water, solvents or cleaning solutions into this area.
• When cleaning the interior of the Breadmaker take care not to bend or damage
the heating element.
• The lid is removable for easy cleaning. Because water may become trapped in the
lid, DO IMMERSE THE LID IN WATER. DO NOT PUT LID IN THE DISHWASHER.
• Be sure the Breadmaker is completely cooled before storing.
Cleaning the Breadmaker
• Allow the Breadmaker to cool completely before cleaning.
• Do not use benzene, alcohol or any harsh solvents as they will mar the stainless
steel body and damage the plastic material on the lid.
Cleaning the Exterior
• Clean exterior surfaces with a soft cloth dampened in a mild solution of warm
water and mild detergent.
• Do not use cleansers, steel wool pads or other abrasive materials.
• Wipe out the fruit and nut dispenser with a soft damp cloth and dry thoroughly.
8. Care and Maintenance