


59
Model PH90 Operating Procedures
080221
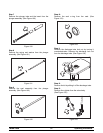
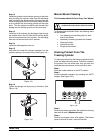
Remove the two small o--rings and one large o--r ing
from the drive shaft.
Step 7
Remove the front drip tray and splash shield. Remove
the ladles from the two cold topping containers.
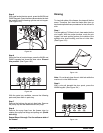
Step 8
Remove the long drip pan from the front panel, the two
short drip pans from the rear panel, and the two
notched drip pans from the left and right side panels.
Take these i tems to the sink for cleaning.
Note: If the drip pans are filled with a n excessive
amount of mix, it is an indication that the drive shaft
seals, cup seals or o--rings should be replaced or
properly lubricated.
Brush Cleaning
We recommend brush cleaning all the shake parts,
then go back and duplicate these steps (where they
apply) for brush cleaning all the soft serve parts. By
doing so, you will not confuse or interchange these
parts for assembly the next morning. Place the parts
in their p roper place in the parts tray.
Step 1
Prepare a sink with an approved cleaning solution
(example: Kay--5
R or Stera--S heenR). USE WARM
W ATER AND FOLLOW THE MANUFACTURER’S
SPECIFICATIONS. If another approved cleaner is
used, dilute according to label instructions. (IMPOR-
TANT: Follow label directions, as too STRONG of a
solution can cause parts damage, while too MILD of a
solution will not provide adequate c leaning.) Make
sure all brushes provided with the freezer are available
for brush cleaning.
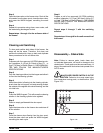
Step 2
Remove the:
S Seal from the drive shaft
S O--rings and guide bearing from the torque
rotor
S Draw valve from the freezer door
S O--rings from the draw valve
S Spinner bearing from the draw valve
S Gasket and front bearing from the freezer
door.
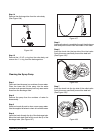
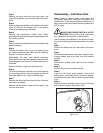
Note: To remove o--rings, use a single service towel
to grasp the o--r ing. Apply pressure in an upward
direction until the o--ring pops out of its groove. With
the other hand, push the top of the o--r ing forward, and
it will roll out of the groove and can be easily removed.
If there is more than one o--ring to be removed, always
remove the rear o--ring first. This will allow the o--r ing
to slide over the forward rings without falling into the
open grooves.
Step 3
Remove the o--rings from the pump feed tubes.
Step 4
Thoroughly brush clean all disassembled parts and
parts trays in the cleaning solution, making sure all
lubricant and mix film is removed. Be sure to brush all
surfaces and holes, especially holes in the pump valve
body and the small syrup holes in the shake freezer
door.
Rinse all parts with clean, warm water.
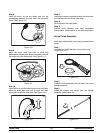
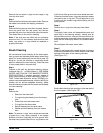
Step 5
Return to the freezer with a small amount of cleaning
solution and the black brush. Brush clean the rear shell
bearings at the back of the freezing cylinders.
(See Figure 127.)
Figure 127
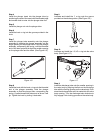
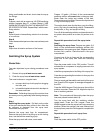
Brush clean the drive hub openings in the rear wall of
the mix hoppers. (See Figure 128.)
Figure 128