


41
NOTE: The lead/lag function can be configured on the LEAD-
LAG screen, which is accessed from the SERVICE menu and
EQUIPMENT SERVICE table. See Table 2, Example 20.
Lead/lag status during chiller operation can be viewed on the
LL_MAINT display screen, which is accessed from the SER-
VICE menu and CONTROL ALGORITHM STATUS table.
See Table 2, Example 12.
Lead/Lag System Requirements:
• all chillers in the system must have software capable of
performing the lead/lag function
• water pumps MUST be energized from the PIC II
controls
• water flows should be constant
• the CCN time schedules for all chillers must be identical
Operation Features:
• 2 chiller lead/lag
• addition of a third chiller for backup
• manual rotation of lead chiller
• load balancing if configured
• staggered restart of the chillers after a power failure
• chillers may be piped in parallel or in series chilled water
flow
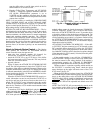
COMMON POINT SENSOR INSTALLATION — Lead/lag
operation does not require a common chilled water point sen-
sor. Common point sensors (Spare Temp #1 and #2) can be
added to the CCM module, if desired. Spare Temp #1 and #2
are wired to plug J4 terminals 25-26 and 27-28 (J4 lower,
respectively).
NOTE: If the common point sensor option is chosen on a
chilled water system, each chiller should have its own common
point sensor installed. Each chiller uses its own common point
sensor for control when that chiller is designated as the lead
chiller. The PIC II cannot read the value of common point sen-
sors installed on the other chillers in the chilled water system.
If leaving chilled water control (ECW CONTROL OPTION
is set to 0 [DSABLE] TEMP_CTL screen) and a common
point sensor is desired (COMMON SENSOR OPTION in
LEADLAG screen selected as 1) then the sensor is wired in
Spare Temp #1 position on the CCM.
If the entering chilled water control option (ECW CON-
TROL OPTION) is enabled (configured in TEMP_CTL
screen) and a common point sensor is desired (COMMON
SENSOR OPTION in LEADLAG screen selected as 1) then
the sensor is wired in Spare Temp #2 position on the CCM.
When installing chillers in series, a common point sensor
should be used. If a common point sensor is not used, the leav-
ing chilled water sensor of the upstream chiller must be moved
into the leaving chilled water pipe of the downstream chiller.
If return chilled water control is required on chillers piped in
series, the common point return chilled water sensor should be
installed. If this sensor is not installed, the return chilled water
sensor of the downstream chiller must be relocated to the return
chilled water pipe of the upstream chiller.
To properly control the common supply point temperature
sensor when chillers are piped in parallel, the water flow
through the shutdown chillers must be isolated so no water by-
pass around the operating chiller occurs. The common point
sensor option must not be used if water bypass around the oper-
ating chiller is occurring.
CHILLER COMMUNICATION WIRING — Refer to the
chiller’s Installation Instructions, Carrier Comfort Network
Interface section for information on chiller communication
wiring.
LEAD/LAG OPERATION — The PIC II not only has the
ability to operate 2 chillers in lead/lag, but it can also start a
designated standby chiller when either the lead or lag chiller is
faulted and capacity requirements are not met. The lead/lag op-
tion only operates when the chillers are in CCN mode. If any
other chiller configured for lead/lag is set to the LOCAL or
OFF modes, it will be unavailable for lead/lag operation.
Lead/Lag Chiller Configuration and Operation
• A chiller is designated the lead chiller when its
LEADLAG: CONFIGURATION value on the LEAD-
LAG screen is set to “1.”
• A chiller is designated the lag chiller when its
LEADLAG: CONFIGURATION value is set to “2.”
• A chiller is designated as a standby chiller when its
LEADLAG: CONFIGURATION value is set to “3.”
• A value of “0” disables the lead/lag designation of a
chiller.
To configure the LAG ADDRESS value on the LEADLAG
screen, always enter the address of the other chiller on the sys-
tem. For example, if you are configuring chiller A, enter the ad-
dress for chiller B as the lag address. If you are configuring
chiller B, enter the address for chiller A as the lag address. This
makes it easier to rotate the lead and lag chillers.
If the address assignments in the LAG ADDRESS and
STANDBY ADDRESS parameters conflict, the lead/lag func-
tion is disabled and an alert (!) message displays. For example,
if the LAG ADDRESS matches the lead chiller’s address, the
lead/lag will be disabled and an alert (!) message displayed.
The lead/lag maintenance screen (LL_MAINT) displays the
message ‘INVALID CONFIG’ in the LEADLAG: CONFIGU-
RATION and CURRENT MODE fields.
The lead chiller responds to normal start/stop controls such
as the occupancy schedule, a forced start or stop, and remote
start contact inputs. After completing start-up and ramp load-
ing, the PIC II evaluates the need for additional capacity. If ad-
ditional capacity is needed, the PIC II initiates the start-up of
the chiller configured at the LAG ADDRESS. If the lag chiller
is faulted (in alarm) or is in the OFF or LOCAL modes, the
chiller at the STANDBY ADDRESS (if configured) is requested
to start. After the second chiller is started and is running, the
lead chiller monitors conditions and evaluates whether the ca-
pacity has been reduced enough for the lead chiller to sustain
the system alone. If the capacity is reduced enough for the lead
chiller to sustain the CONTROL POINT temperatures alone,
then the operating lag chiller is stopped.
If the lead chiller is stopped in CCN mode for any reason
other than an alarm (*) condition, the lag and standby chillers
are also stopped. If the configured lead chiller stops for an
alarm condition, the configured lag chiller takes the lead chill-
er’s place as the lead chiller, and the standby chiller serves as
the lag chiller.
If the configured lead chiller does not complete the start-up
before the PRESTART FAULT TIMER (a user-configured
value) elapses, then the lag chiller starts and the lead chiller
shuts down. The lead chiller then monitors the start request
from the acting lead chiller. The PRESTART FAULT TIMER is
initiated at the time of a start request. The PRESTART FAULT
TIMER provides a timeout if there is a prestart alert condition
that prevents the chiller from starting in a timely manner. The
PRESTART FAULT TIMER parameter is on the LEADLAG
screen, which is accessed from the EQUIPMENT SERVICE
table of the SERVICE menu.
If the lag chiller does not achieve start-up before the PRE-
START FAULT TIMER elapses, the lag chiller stops, and the
standby chiller is requested to start, if configured and ready.